

Manage applications for the API
If another system (for example your HR system or ERP) should send requests through the programming interface (API), it needs access: an application with a client ID and a secret. You create it here and give it to your integrator.
The list of applications
Section titled “The list of applications”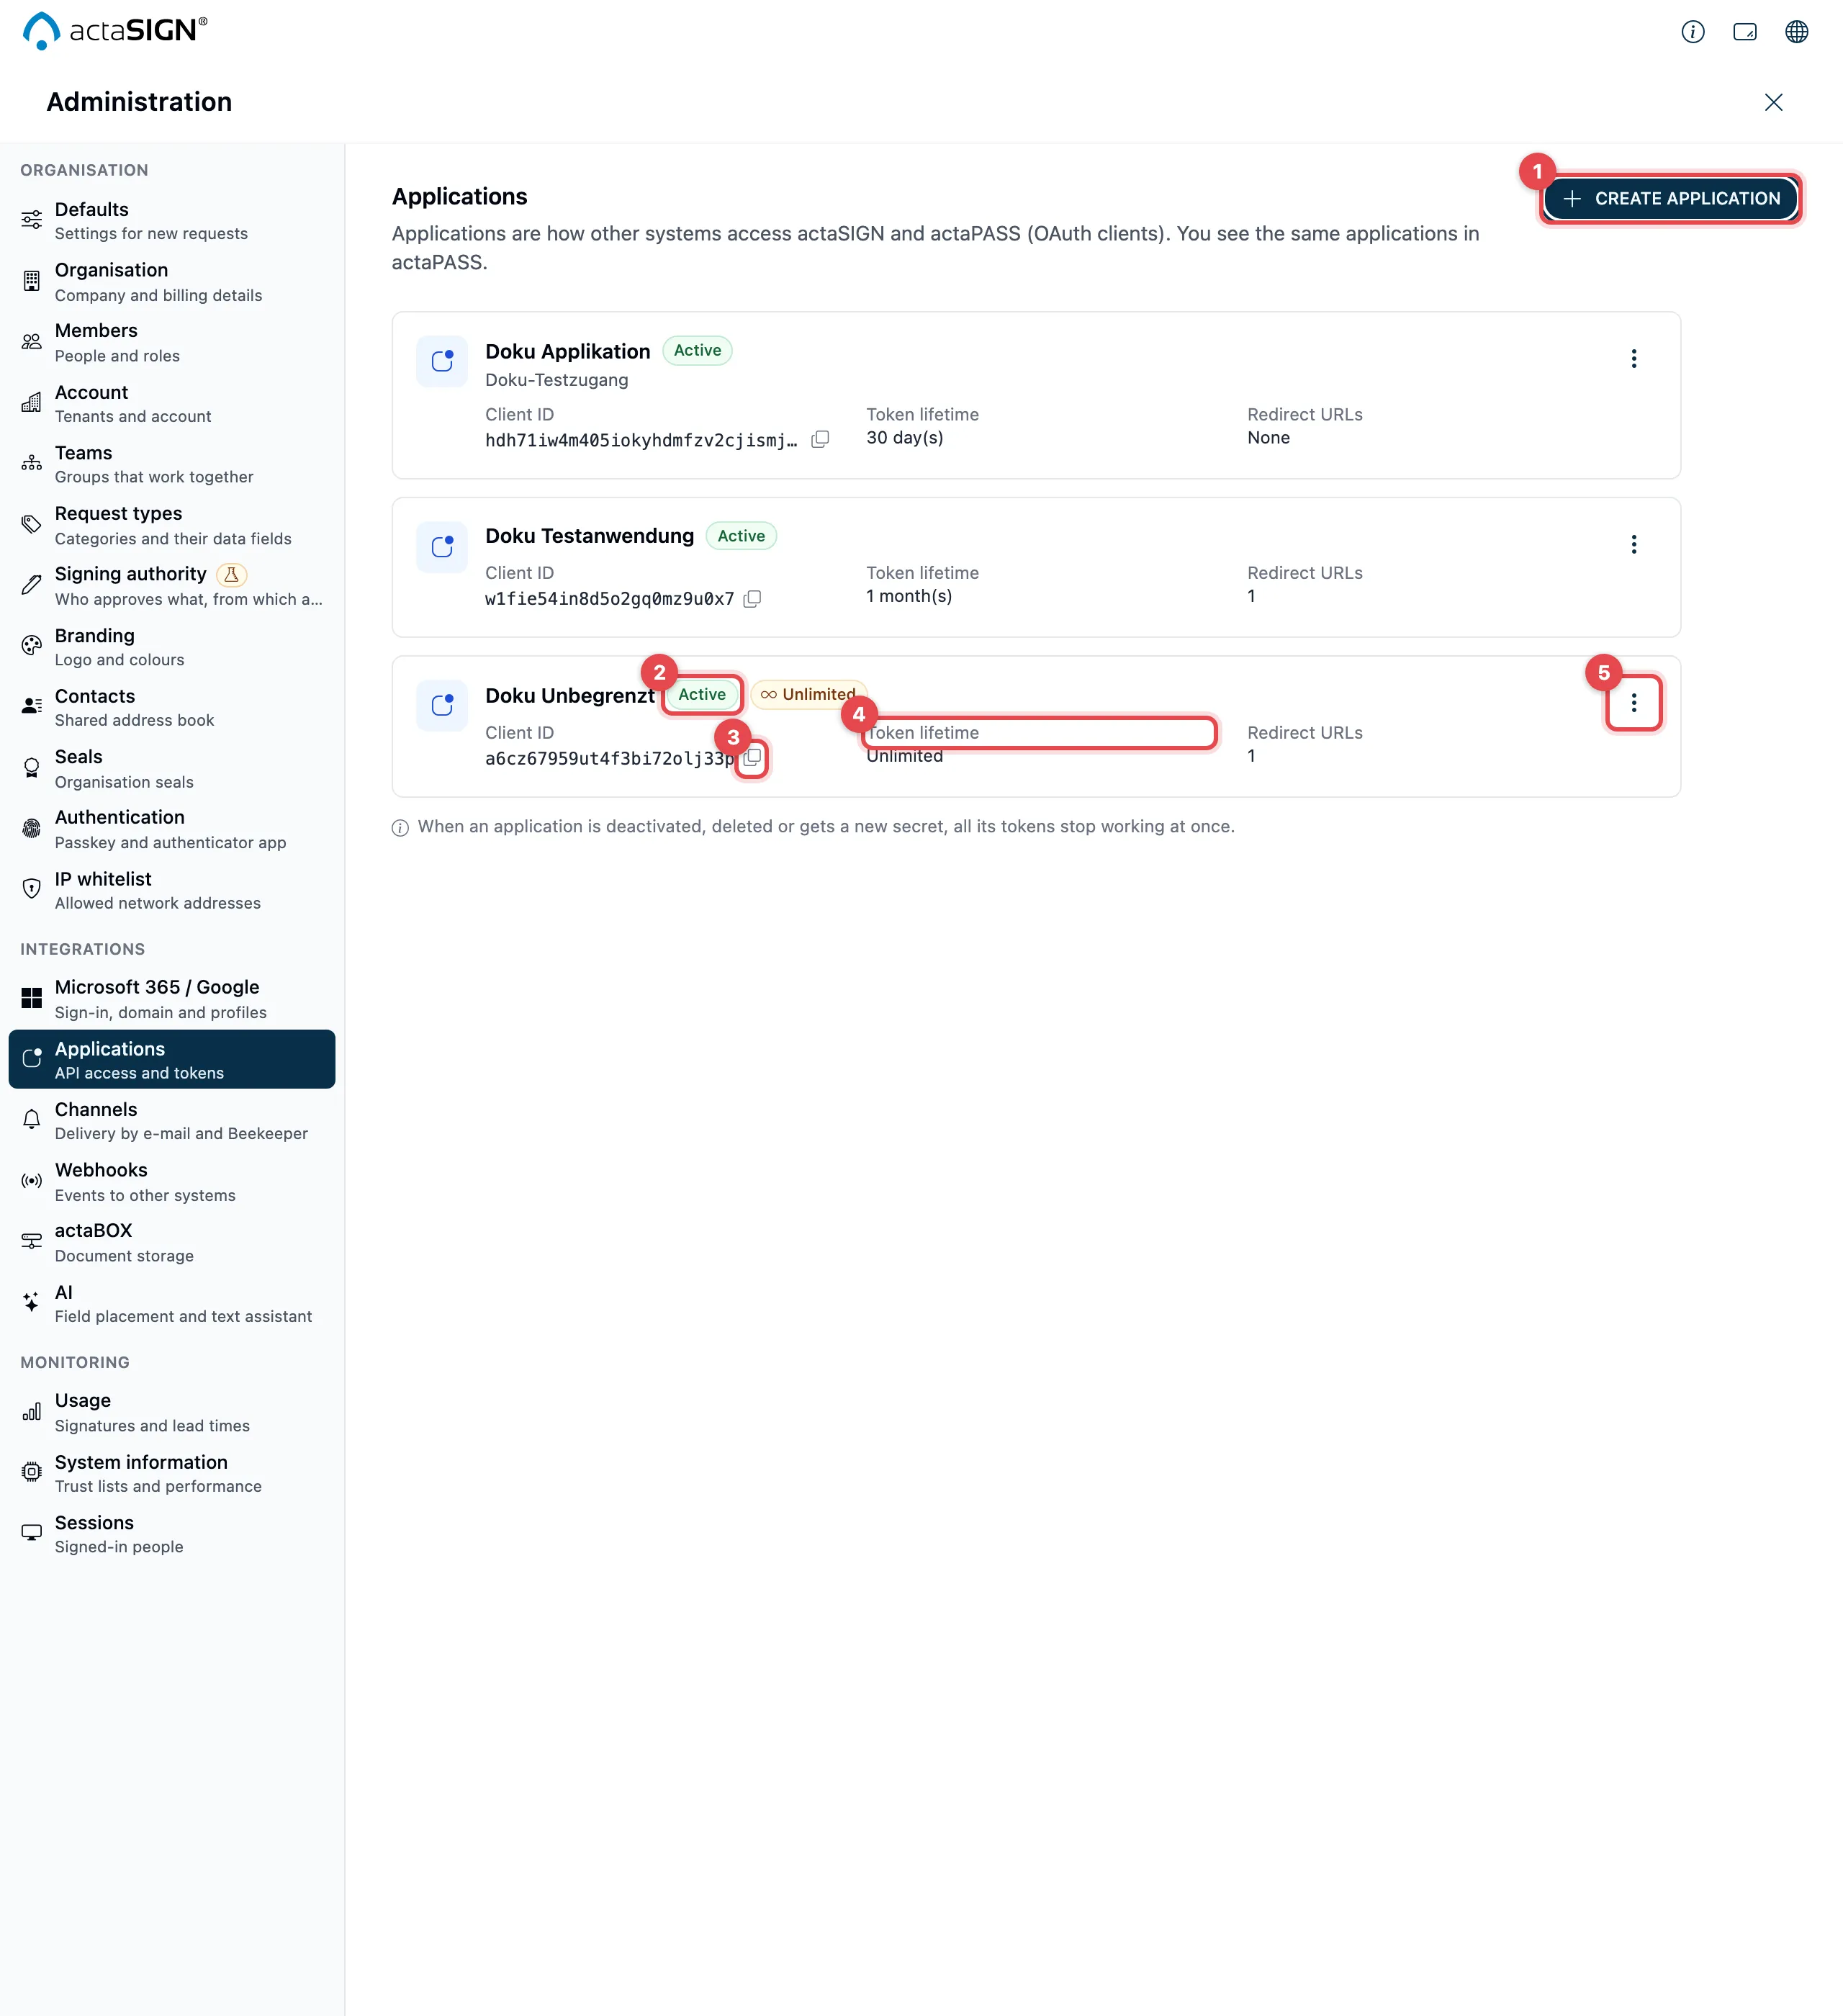
- Use Create application to add new access.
- Next to the name you see Active or Deactivated, and also Unlimited if the tokens never expire.
- Client ID: copy it with the icon next to it (Copy client ID).
- Token lifetime and the number of Redirect URLs (None if there are none).
- Use ⋮ to reach all actions for the application, see below.
Create an application
Section titled “Create an application”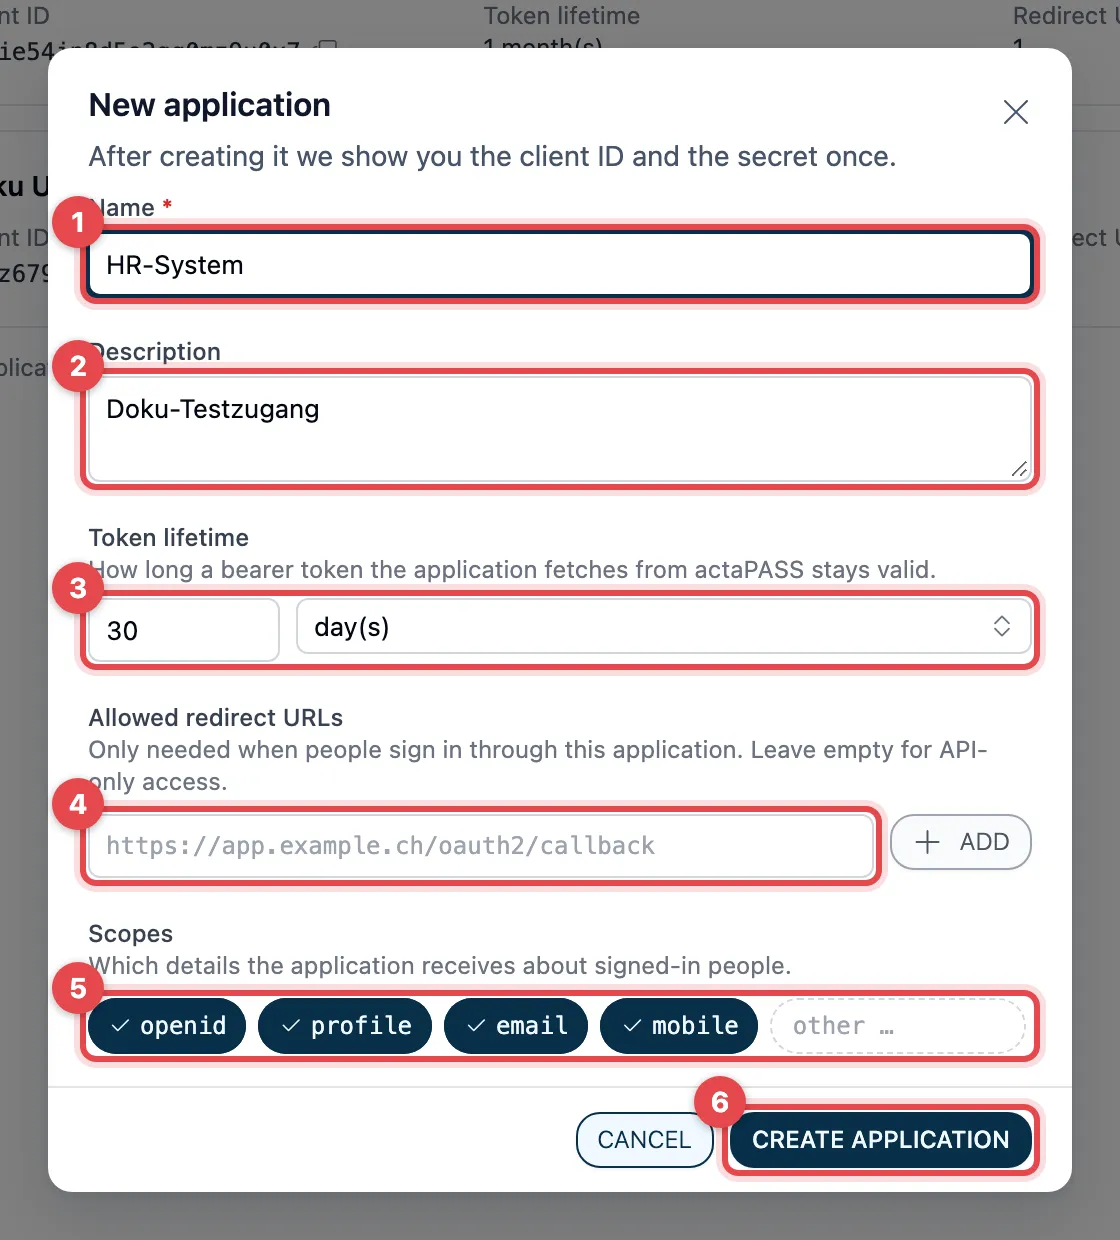
- Click Create application and enter a Name, for example “HR system”.
- Description: optional, which system uses this access.
- Token lifetime: how long a token that the other system fetches stays valid. Enter a number and choose hour(s), day(s), week(s), month(s) or year(s), or Unlimited. New applications start with 30 days.
- Allowed redirect URLs: only needed when people sign in through this
application. Enter a full address starting with
https://and click Add. Leave it empty for API-only access. - Scopes: which details the application receives about signed-in
people.
openid,profile,emailandmobileare switched on; a click switches a scope off or on. Under other … you enter a scope of your own. - Click Create application.
What each unit means and how large the number may be at most is explained for the actaPASS application; the field follows the same rules in both apps.
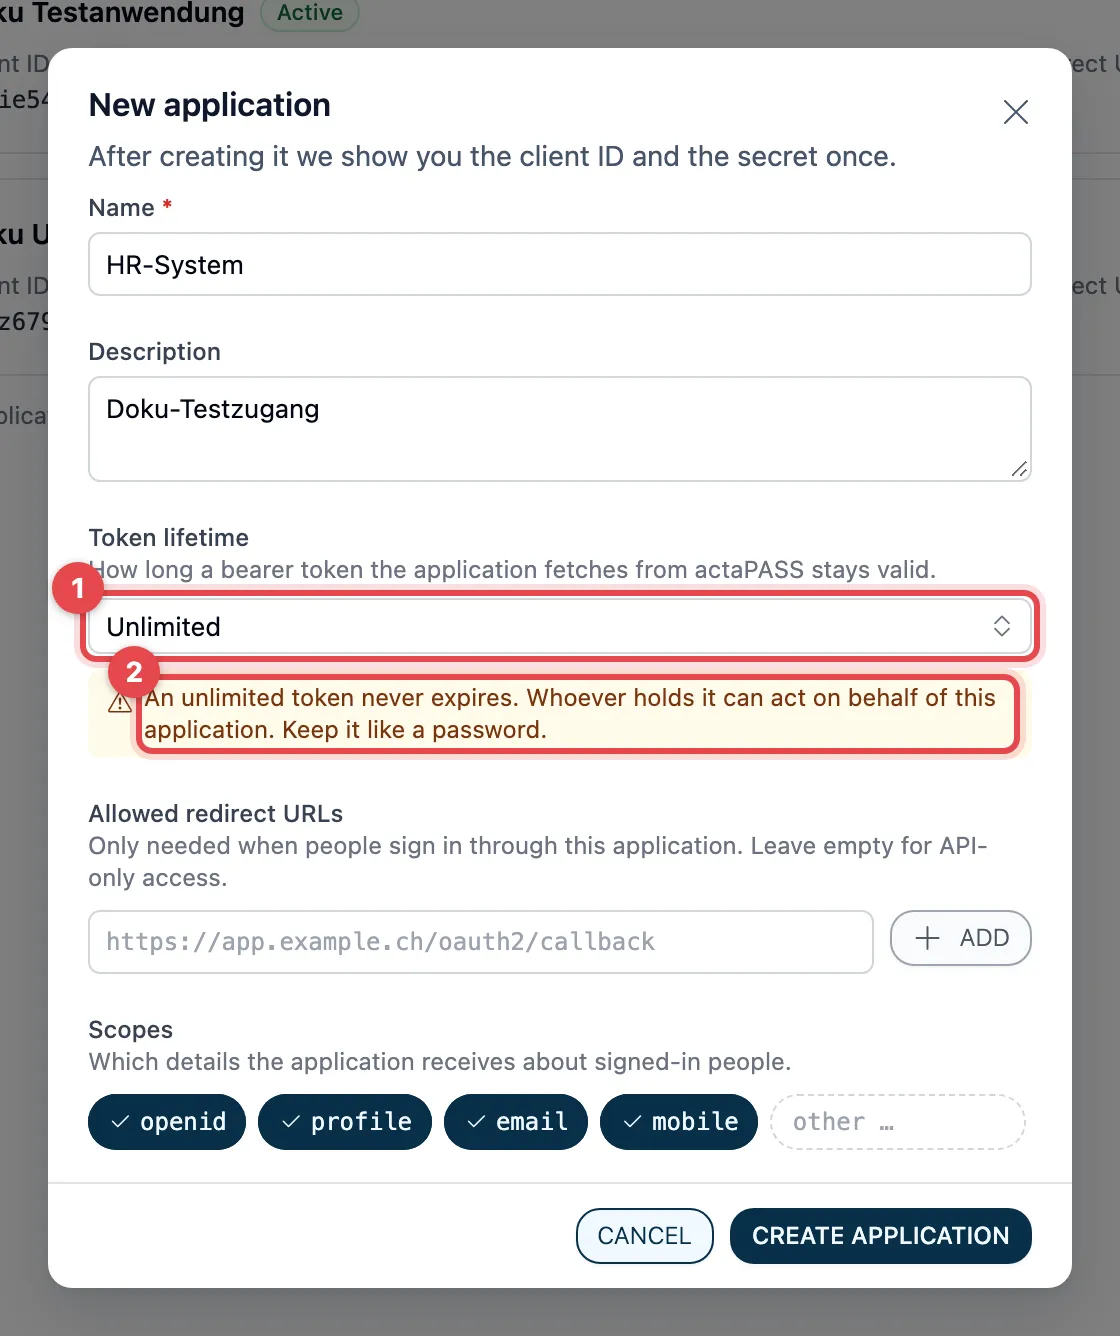
If you choose Unlimited, actaSIGN warns you: an unlimited token never expires. Whoever holds it can act on behalf of this application. Choose a limited lifetime whenever possible.
Keep the client ID and secret safe
Section titled “Keep the client ID and secret safe”Right after creating the application, actaSIGN shows the Client ID and the Secret (client secret). actaSIGN creates both itself.
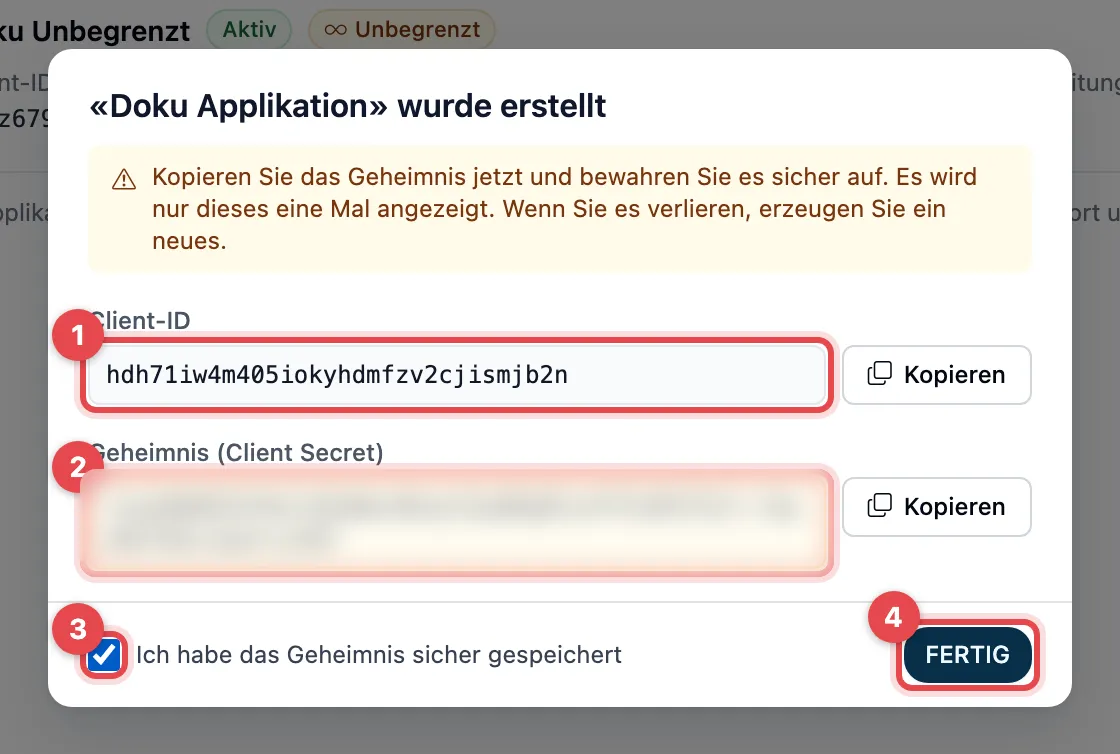
- Copy the Client ID with Copy.
- Copy the Secret (client secret) with Copy and keep it safe. It is shown only this once.
- Tick I have stored the secret safely.
- Click Done. You cannot close the dialog before that.
If the secret is lost, create a new one (⋮ → Create new secret). The old one then stops working.
Create an unlimited bearer token
Section titled “Create an unlimited bearer token”If the other system cannot fetch a token itself, create a bearer token and give it to your integrator.
- Open ⋮ → Edit, choose the unit Unlimited under Token lifetime and click Save.
- Open ⋮ next to the application and choose Create bearer token. This entry only appears for an active application whose saved lifetime is Unlimited.
- actaSIGN fetches the token from actaPASS and shows it once, with the date until which it is valid. Copy it with Copy.
- Tick I have stored the token safely and click Done.
The other system sends the token in the header Authorization: Bearer …
with every API request. Each click on Create bearer token creates a new
token; earlier ones stay valid until you revoke them as described
below.
Change, lock or delete an application
Section titled “Change, lock or delete an application”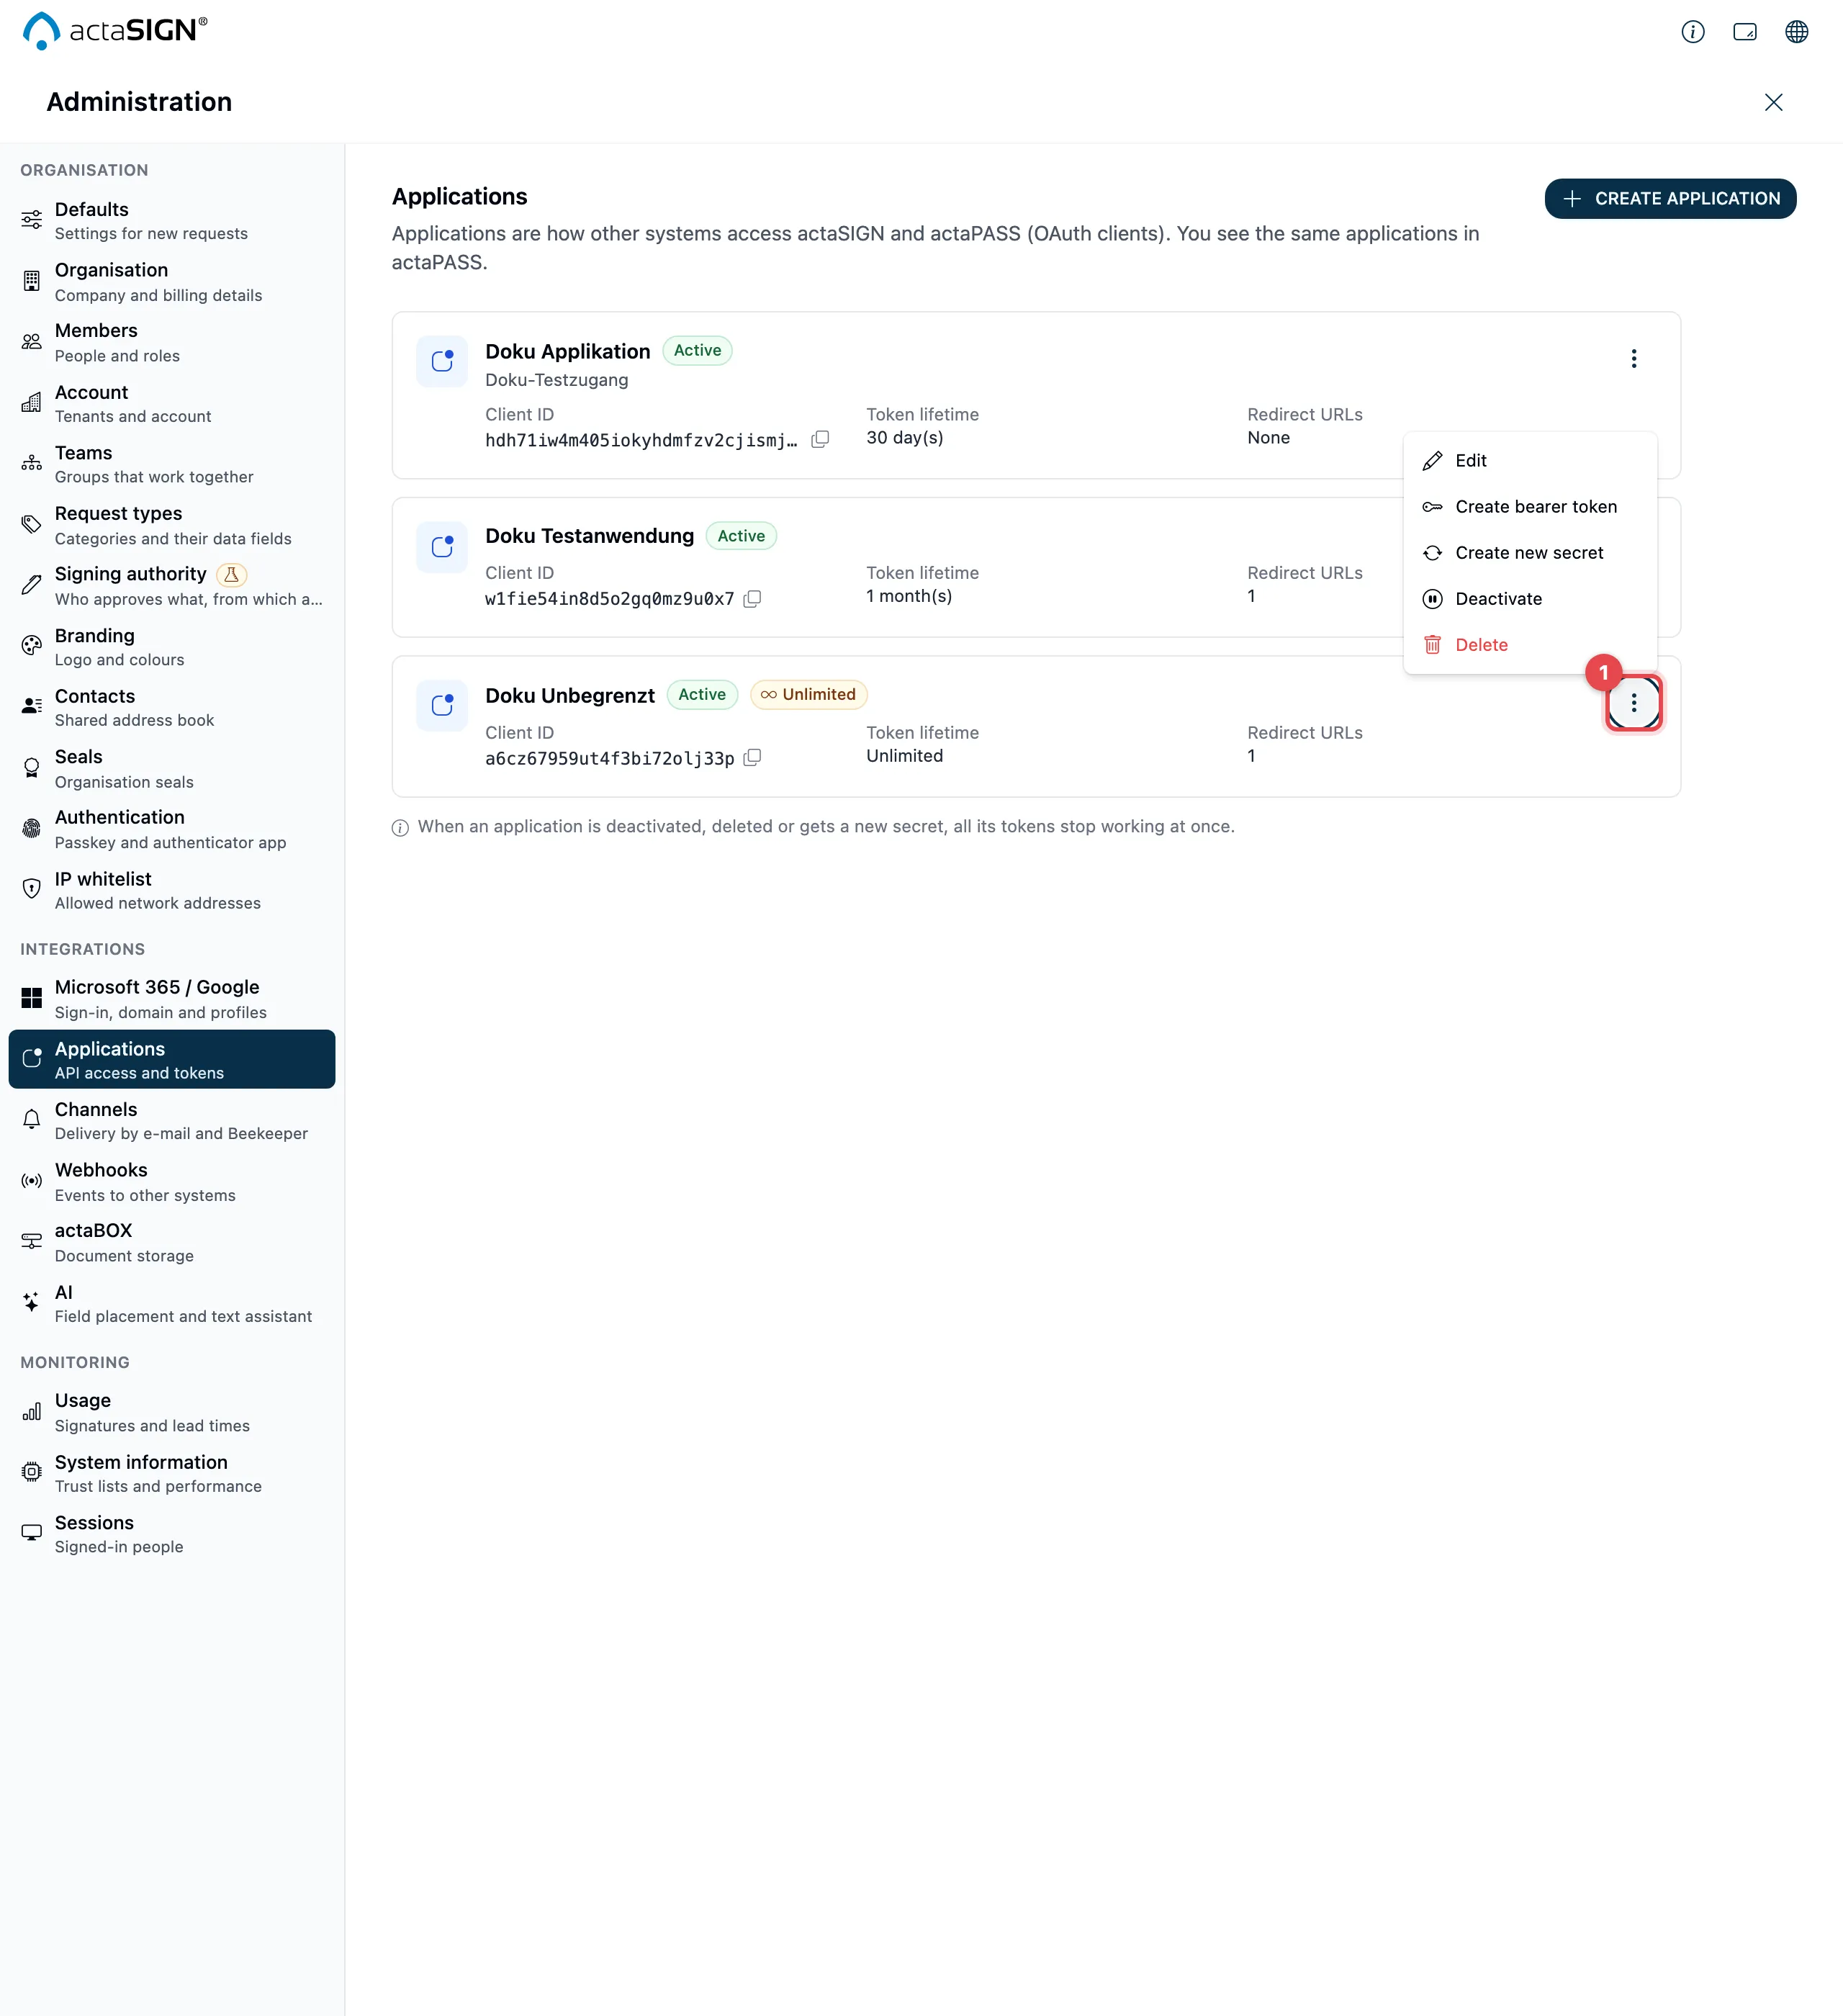
| Entry in the ⋮ menu | What happens |
|---|---|
| Edit | Change the name, description, lifetime, redirect URLs and scopes. A new lifetime applies to tokens issued from now on. |
| Create bearer token | See above. |
| Create new secret | After a confirmation, a new secret, shown once as when creating the application. The old one stops working, and all tokens of the application are revoked at once. |
| Deactivate | After a confirmation, the application gets no more tokens, and all existing tokens are revoked at once. |
| Activate | Shown for a deactivated application. It can fetch tokens again; the tokens revoked when you deactivated it stay revoked. |
| Delete | After a confirmation (Delete for good), the application is deleted and all its tokens are revoked at once. This cannot be undone. |
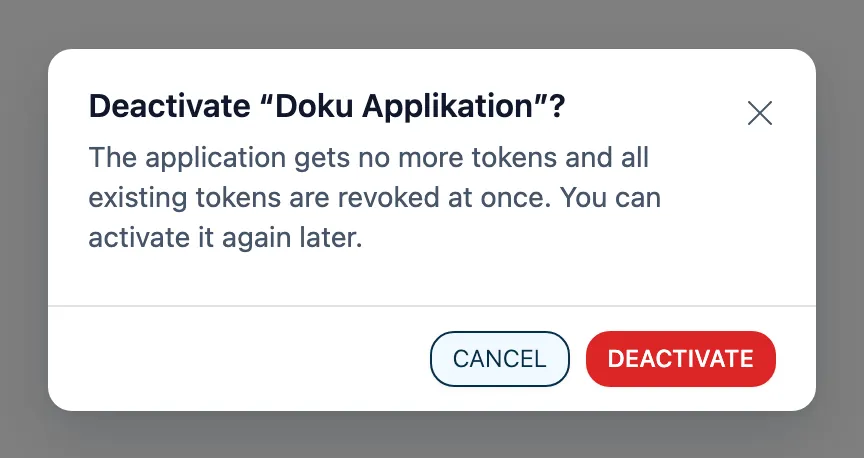
After deactivating, deleting or creating a new secret, actaSIGN tells you how many tokens were revoked, for example “2 token(s) were revoked.”
Revoke tokens
Section titled “Revoke tokens”To block a token at once, for example because it has fallen into the wrong hands, choose ⋮ → Create new secret, Deactivate or Delete next to the application in actaSIGN. All tokens of the application that are still valid are then revoked at once, in actaSIGN and in actaPASS, including the tokens from Create bearer token. The other system then needs a new secret or a new token.
If you only want to block the tokens and keep the secret (for example because a bearer token was passed on but the secret is safe), choose ⋮ → Deactivate and then ⋮ → Activate. The other system then fetches new tokens with its secret; create a new bearer token as described above.
Also in actaPASS
Section titled “Also in actaPASS”You can also see and change the same applications in actaPASS under Set up API access for other systems (called “Applications” there too). A change in one place applies in the other right away.
- In actaSIGN (recommended): only here do Create new secret, Deactivate and Delete revoke the existing tokens at once.
- In actaPASS: when you look after a company account with several tenants. Still block tokens in actaSIGN. actaPASS has no deactivate; you activate a deactivated application again in actaSIGN.
Good to know
Section titled “Good to know”- The tokens that are revoked are those the application fetched itself or that were made with Create bearer token. People who signed in through the application in the browser stay signed in.
- A deactivated application appears dashed and grey in the list. You cannot create a bearer token for it.
- The secret and the token never appear in the audit log. It only shows who created, changed, deactivated or deleted an application or created a token, and how many tokens were revoked.
- If actaSIGN reports “actaPASS did not issue a token”, try again later. If the error persists, contact support.