

Place fields in the document
After the workflow, actaSIGN opens the document. Here you place, for each person, the fields they fill in or sign. Each person has their own colour, and each field belongs to exactly one person.
The tools
Section titled “The tools”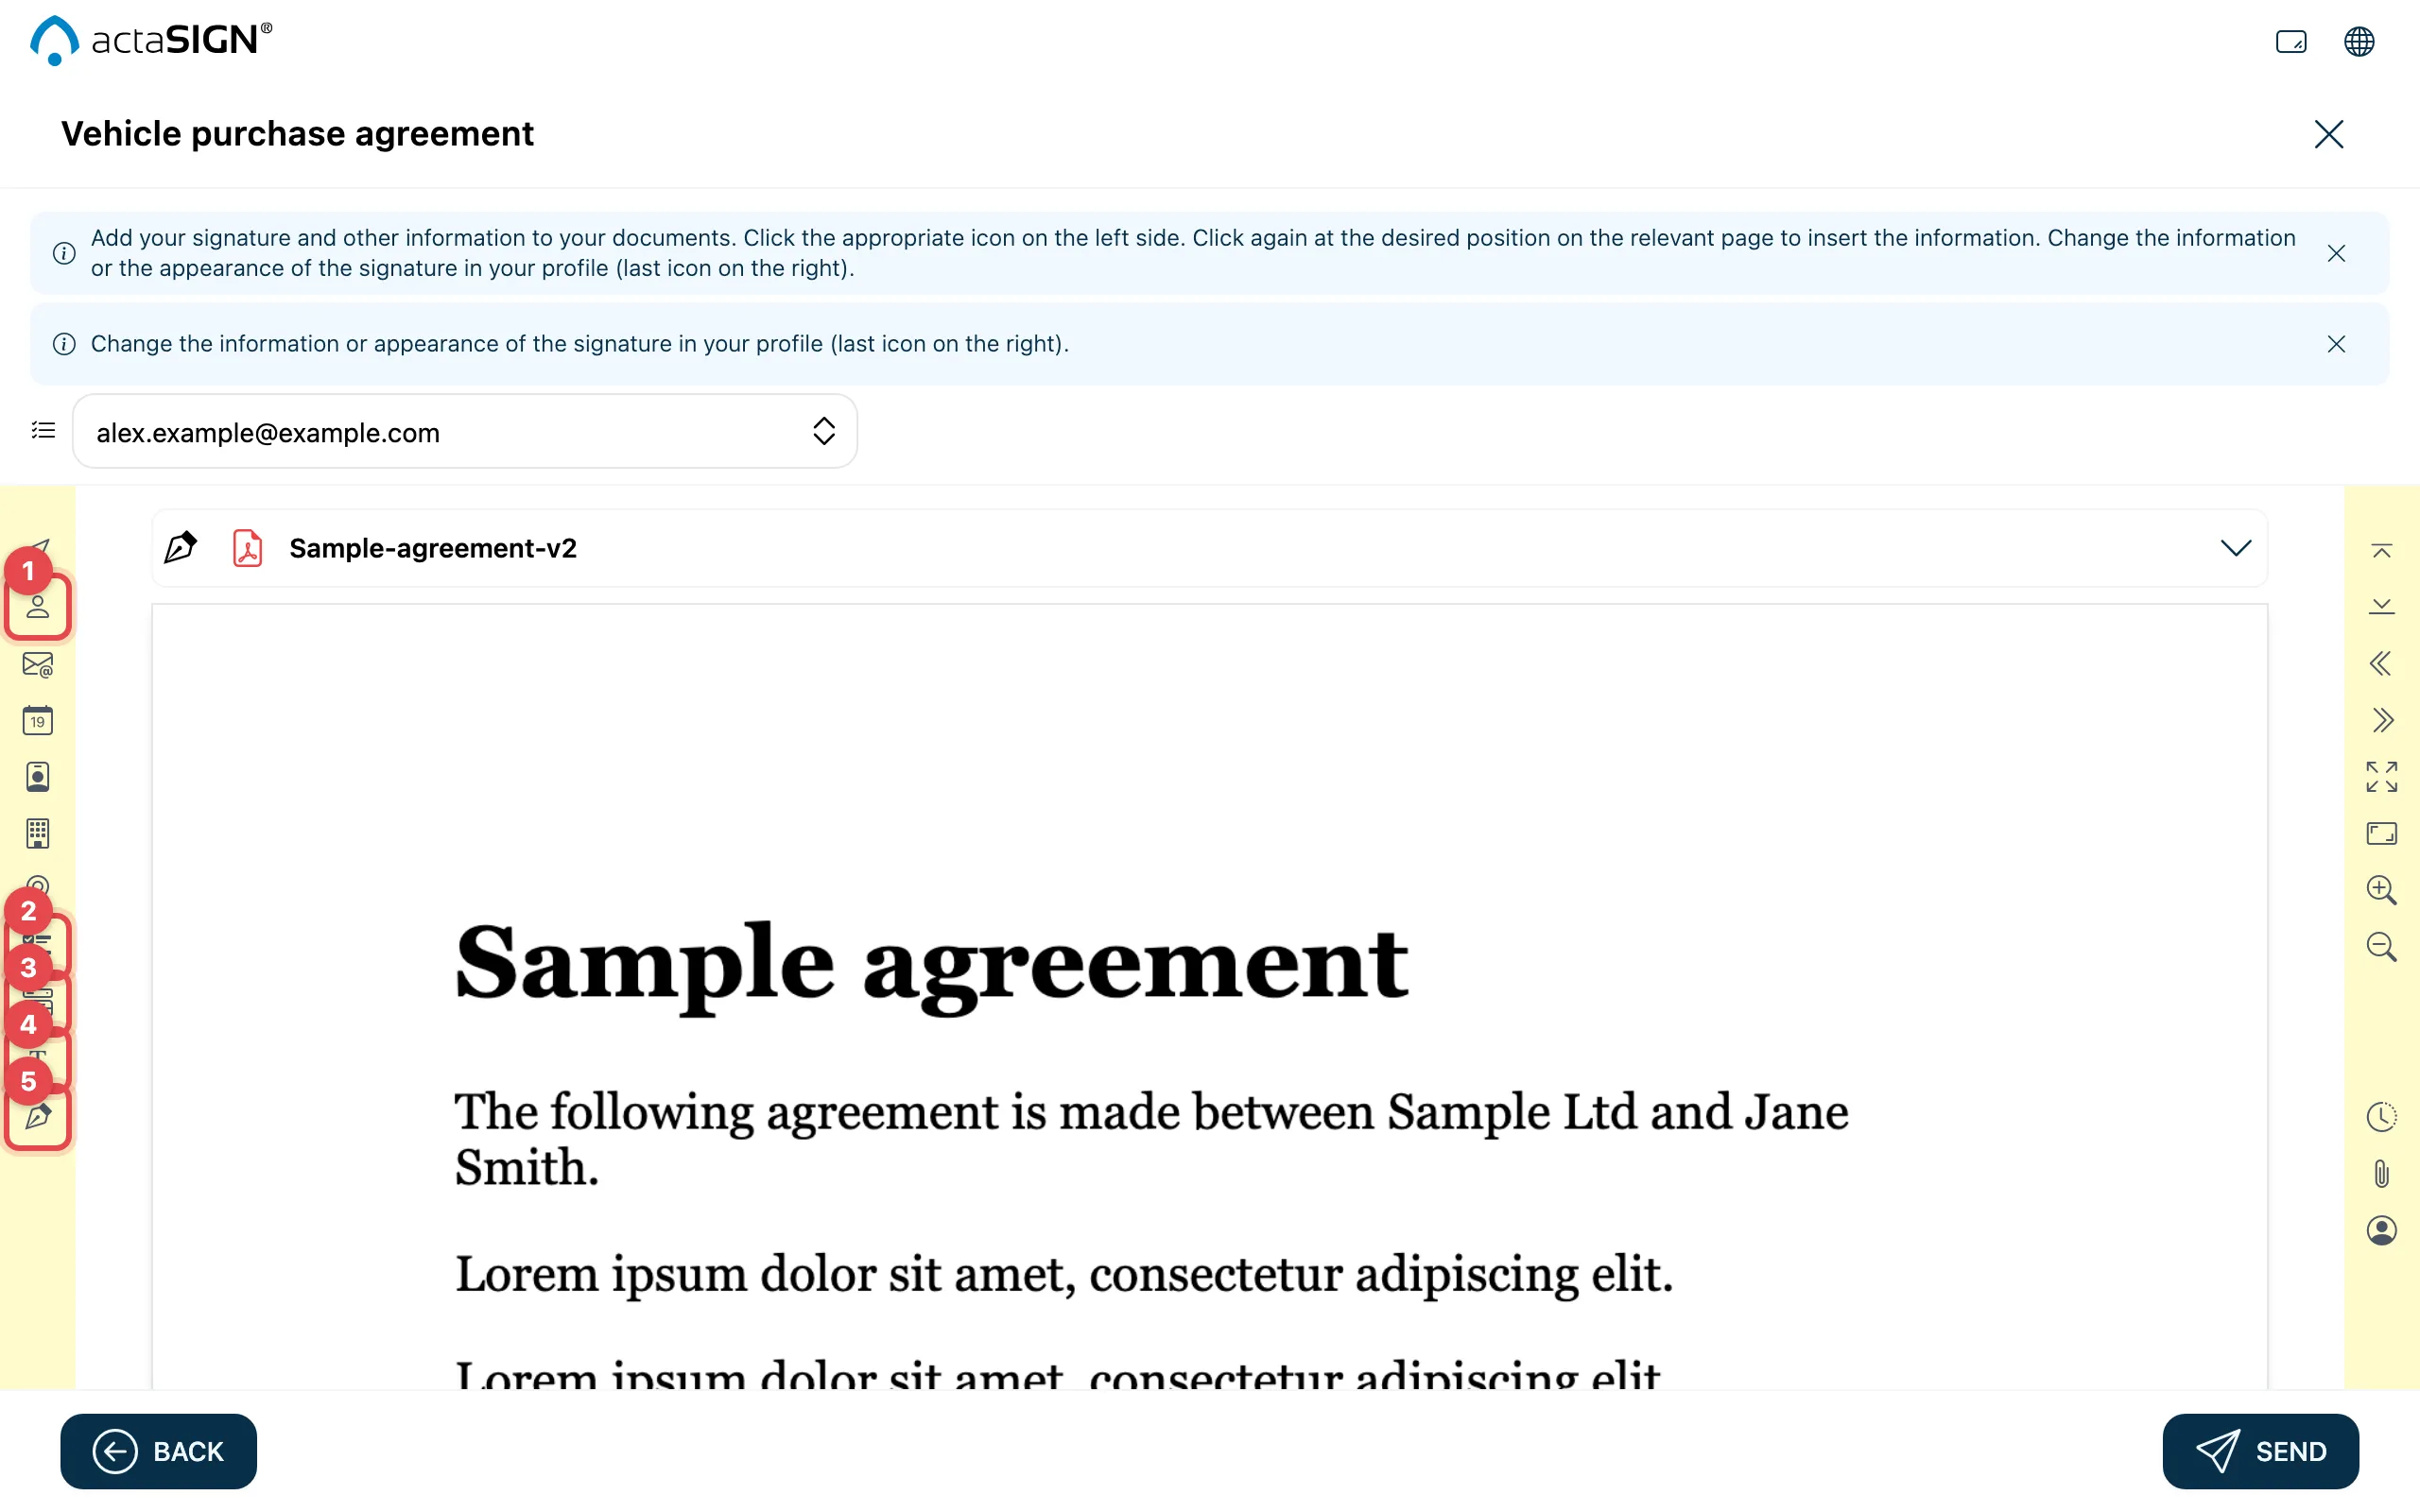
The tools are on the left. If you move the mouse over them, you see their names. From top to bottom:
| Tool | What the person sees |
|---|---|
| Arrow | No field: you use it to select and move fields. |
| Full name (1) | Their name, filled in automatically |
| Email address | Their e-mail address |
| Signing date | The date on which they sign |
| Job title | Their role or job title from the profile |
| Organization | Their organization |
| Locality | Their place |
| Checkbox (2) | A box to tick |
| Selection field (3) | A list from which they choose an entry |
| Individual text (4) | A text field they fill in |
| Signature representation (5) | The spot where they sign |
- Above the document, choose the person. New fields get their colour.
- Click a tool on the left.
- Click the spot in the document where the field should go.
- Drag the field to the right place, or drag its corners to the right size.
When you click a field, a small bar with its settings appears next to it. The cog (Configure) opens all settings; the bin (Delete field) removes the field.
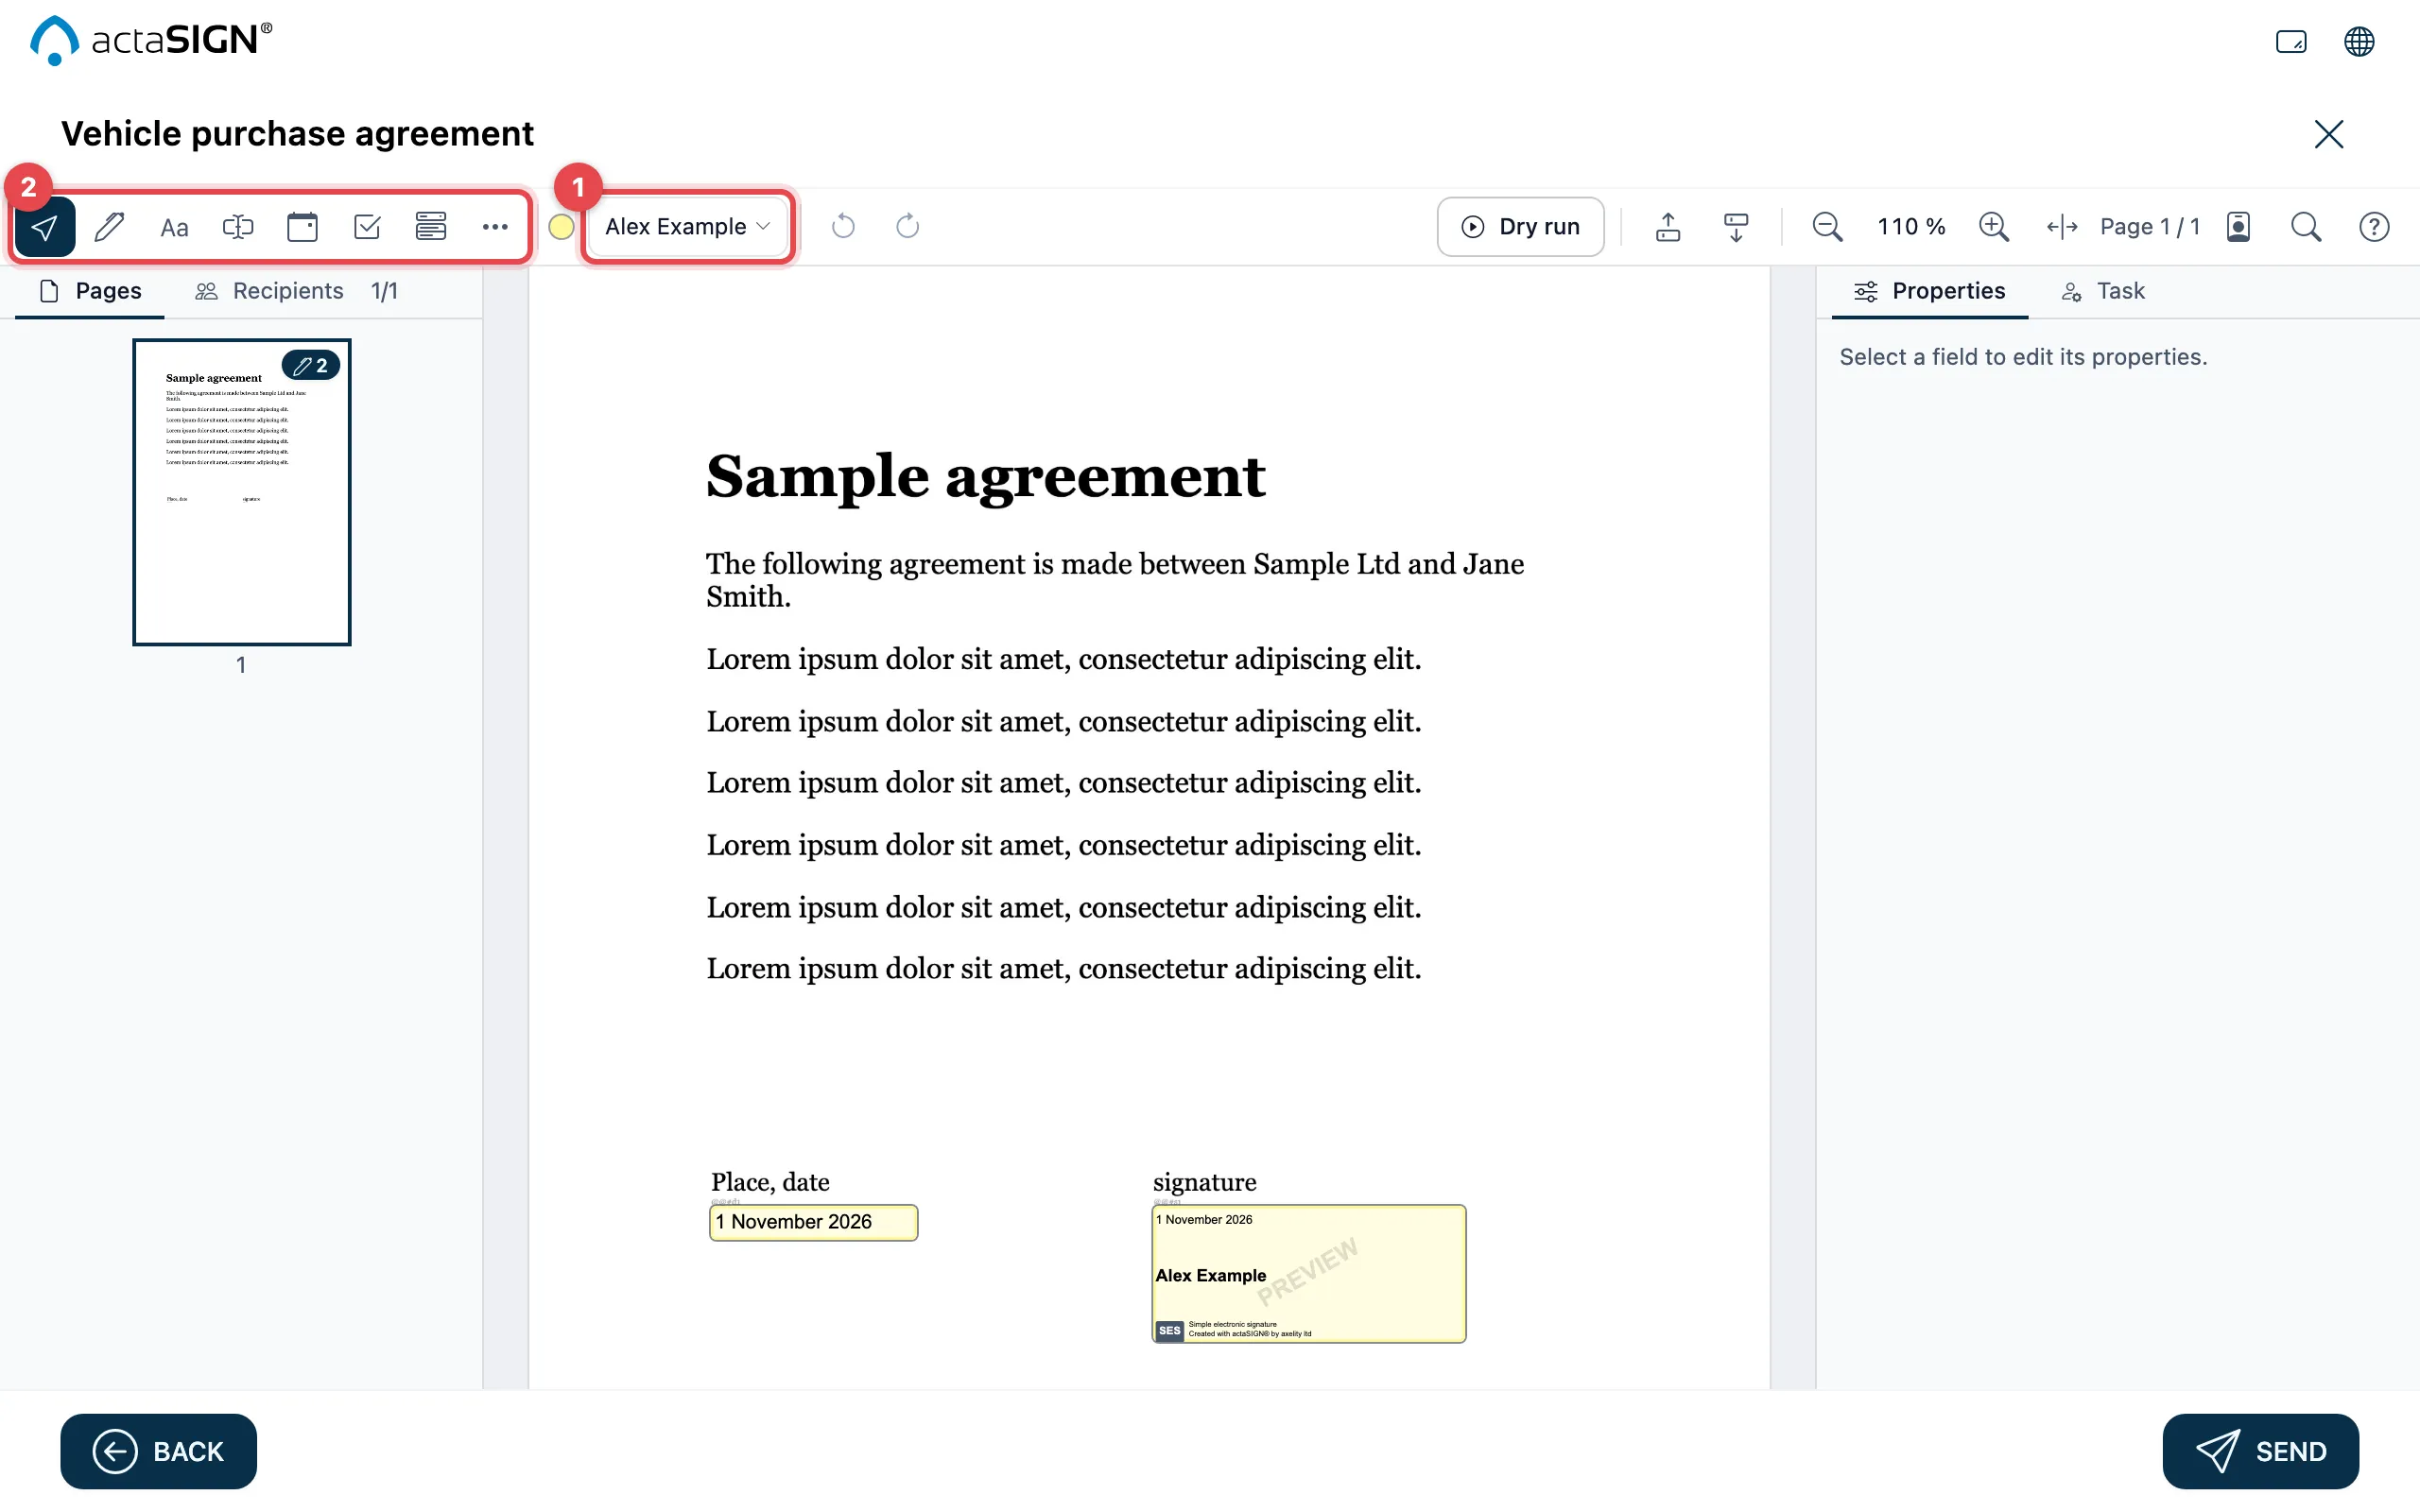
- At the top, under Recipient of new fields, choose the person. New fields get their colour.
- Click a tool in the toolbar.
- Click the spot in the document where the field should go. Escape stops the tool.
- With Select (the arrow) you move fields or drag their corners to change their size.
If you move the mouse over a tool, you see its name. From left to right:
| Tool | What the person sees |
|---|---|
| Select | No field: you use it to select and move fields. |
| Signature representation | The spot where they sign |
| Initials | The spot for their initials |
| Individual text | A text field they fill in |
| Signing date | The date on which they sign |
| Checkbox | A box to tick |
| Selection field | A list from which they choose an entry |
| More fields (three dots) | The person’s Full name, Email address, Job title, Organization and Locality |
When you click a field, all its settings are on the right under Properties. Above the field, Duplicate, Copy to pages and Delete appear. Undo and Redo are in the toolbar; the question mark opens the Keyboard shortcuts.
Text field
Section titled “Text field”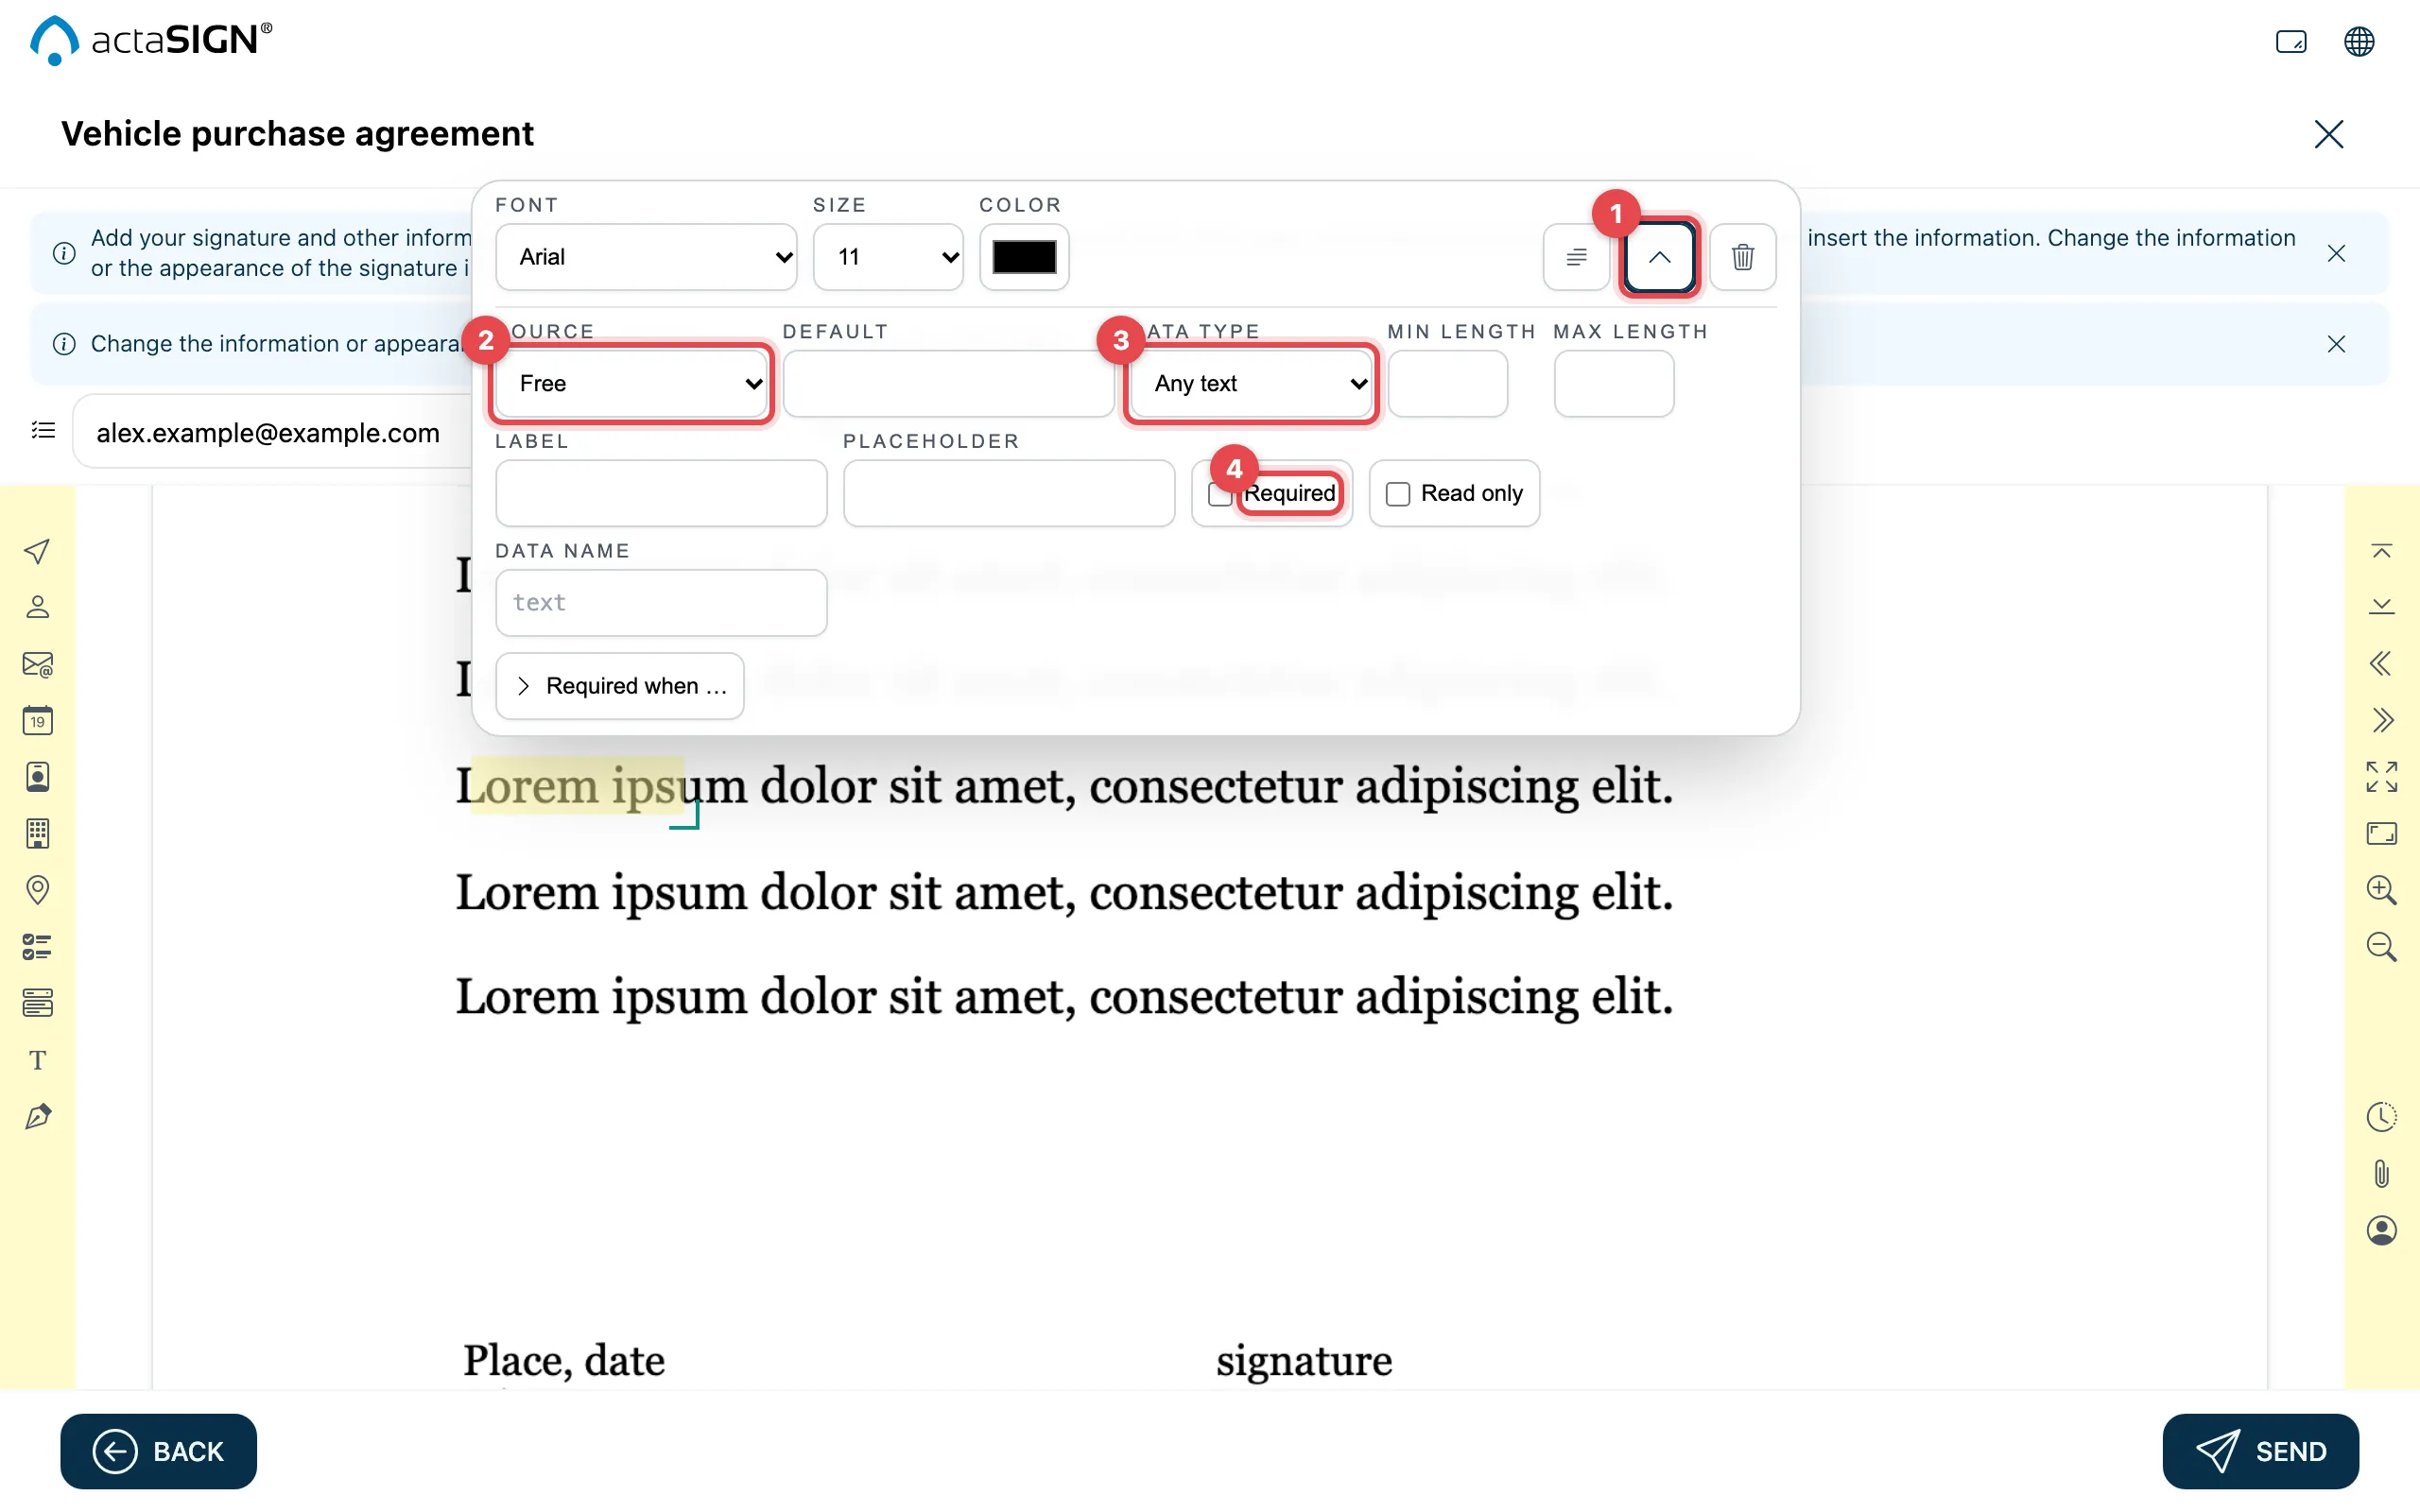
- Configure opens the settings.
- Source: Free lets the person write what they want. Another source fills the field with a detail about the person, e.g. Job title or Mobile.
- Data type: checks the entry, e.g. Number, Date, Email or Pattern (your own pattern under Pattern).
- Required: without an entry, the person cannot sign.
More settings: Label (what the field is called if it is still missing when signing), Placeholder, Default, Min length and Max length, Read only, Multi-line text, Font, Size, Color, Alignment and If too long.
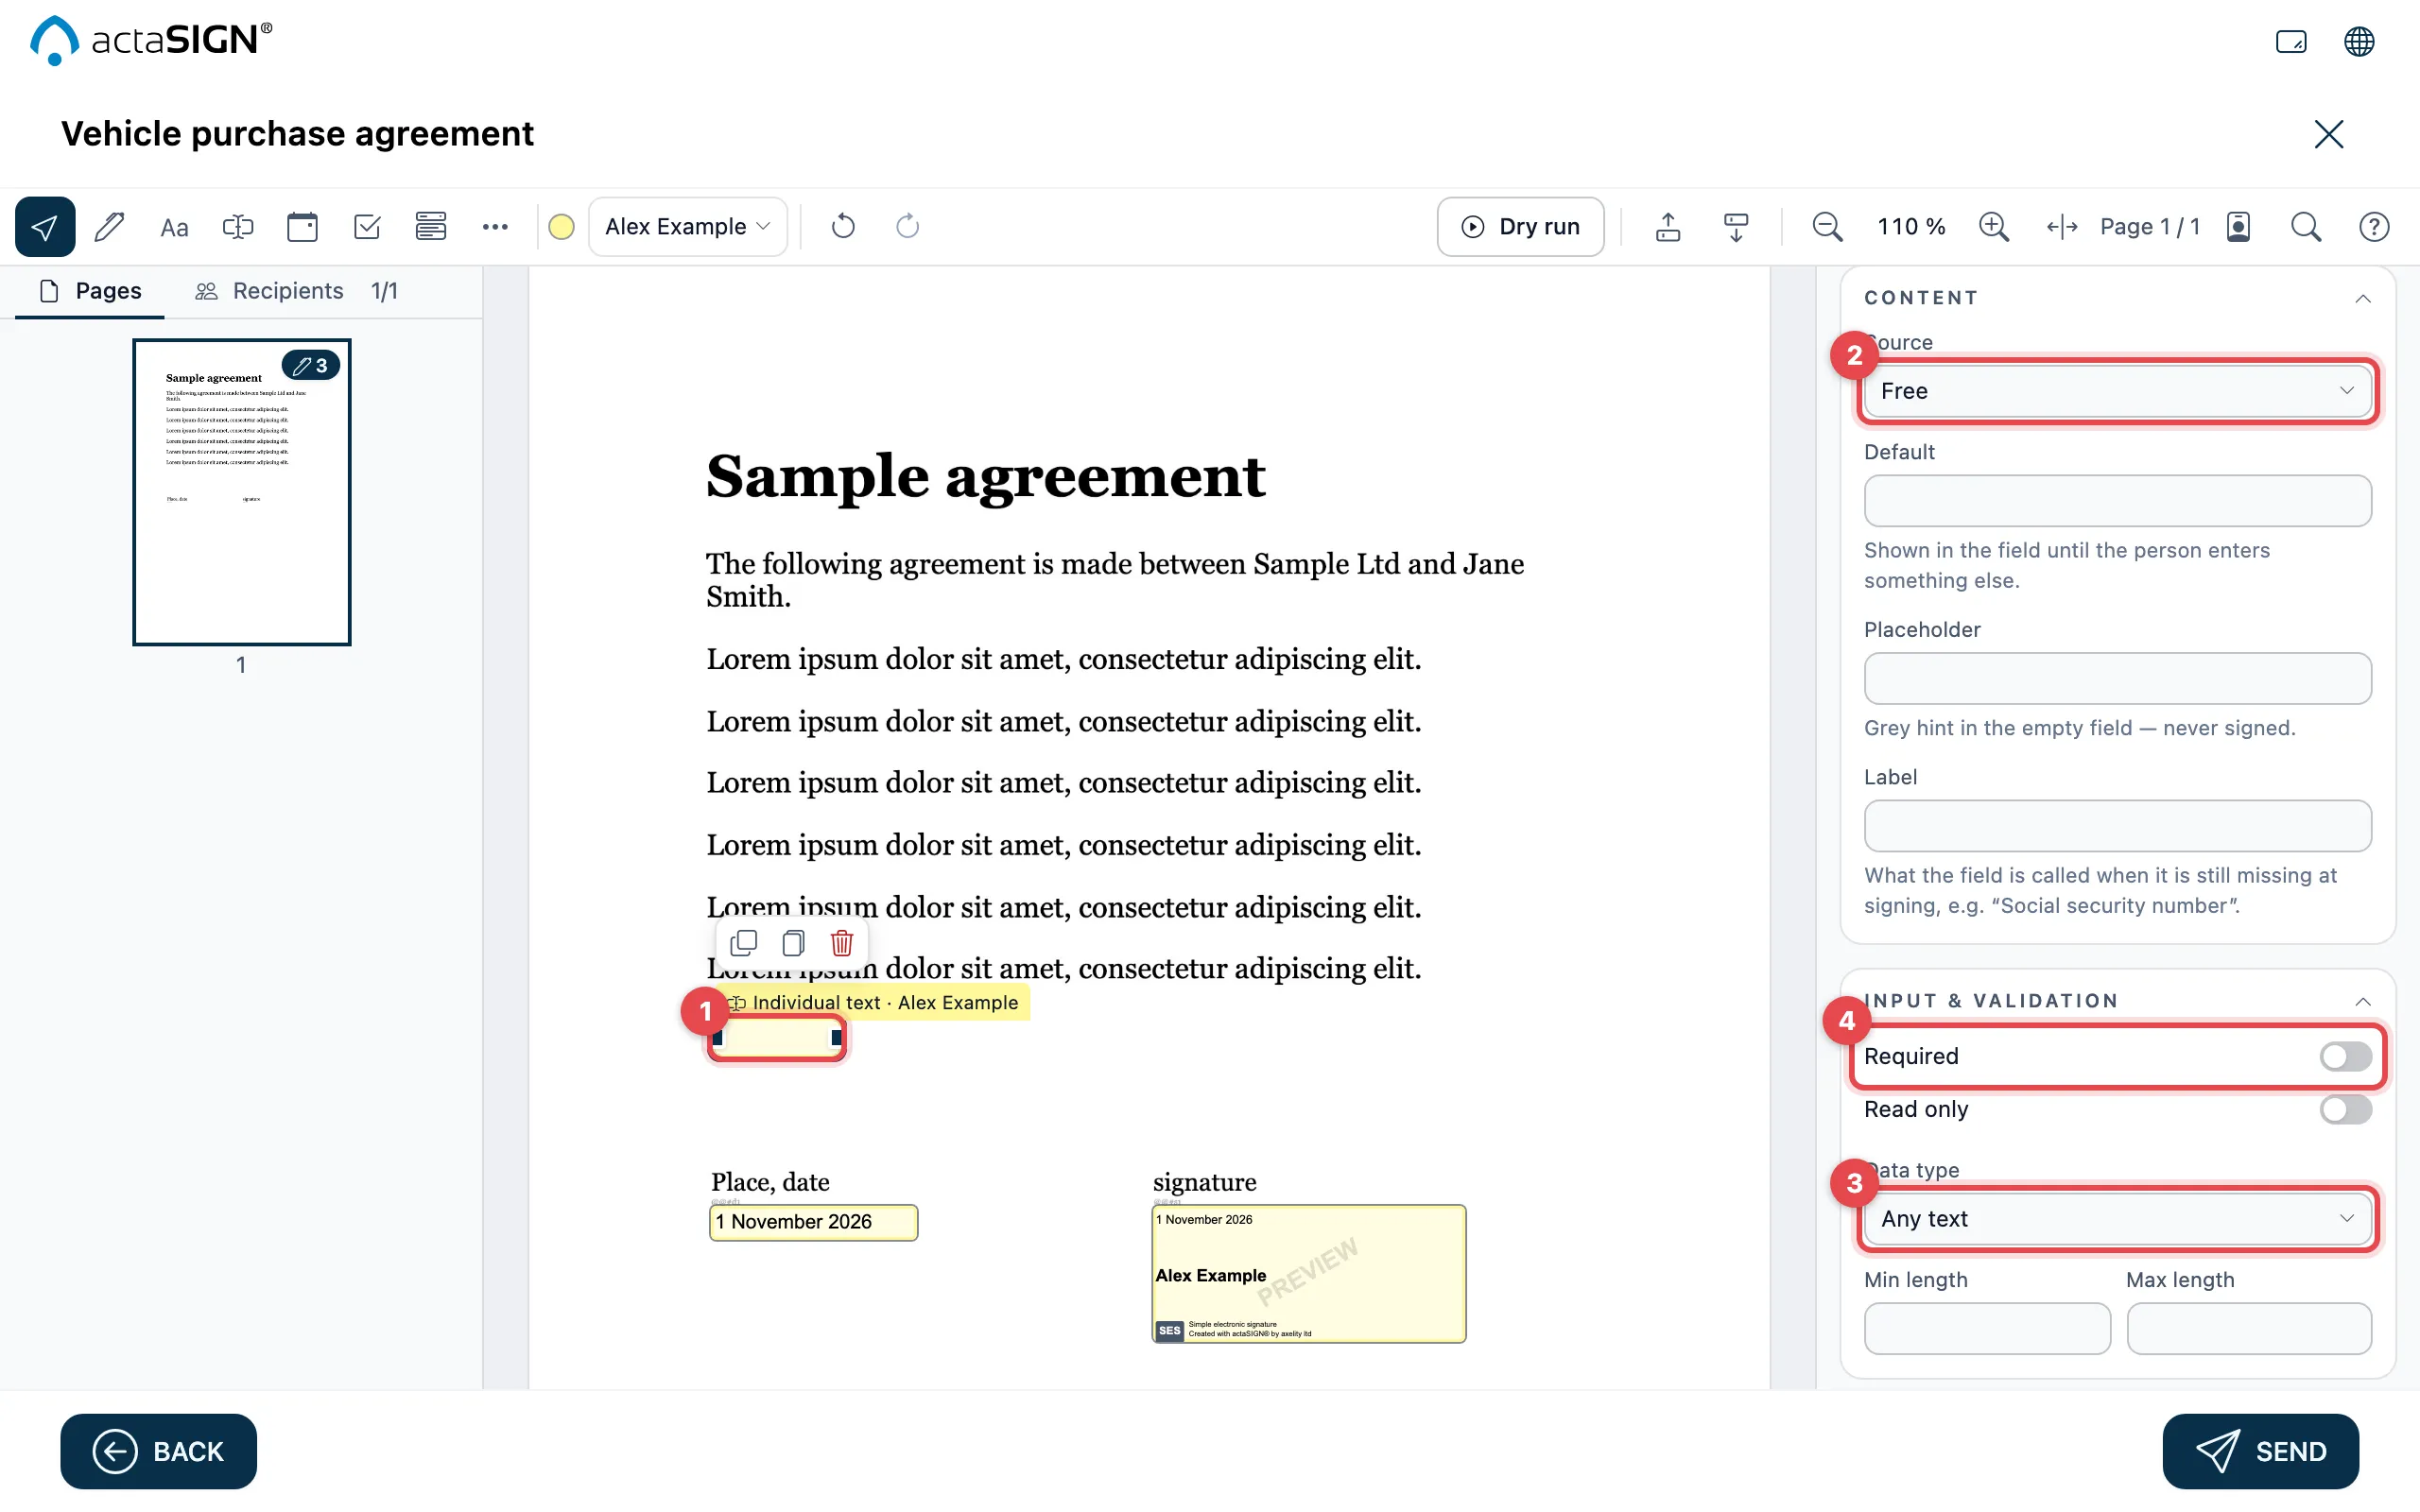
- Click the field. Its Properties appear on the right.
- Source (Content section): Free lets the person write what they want. Another source fills the field with a detail about the person, e.g. Job title or Mobile.
- Data type (Input & validation section): checks the entry, e.g. Number, Date, Email or Pattern (your own pattern under Pattern).
- Required: without an entry, the person cannot sign.
You open and close the sections with a click on their title. Under Content you also find Default, Placeholder and Label, under Input & validation also Read only, Min length and Max length, and under Text the Font, Size, Color, Multi-line text and If too long.
Signature field
Section titled “Signature field”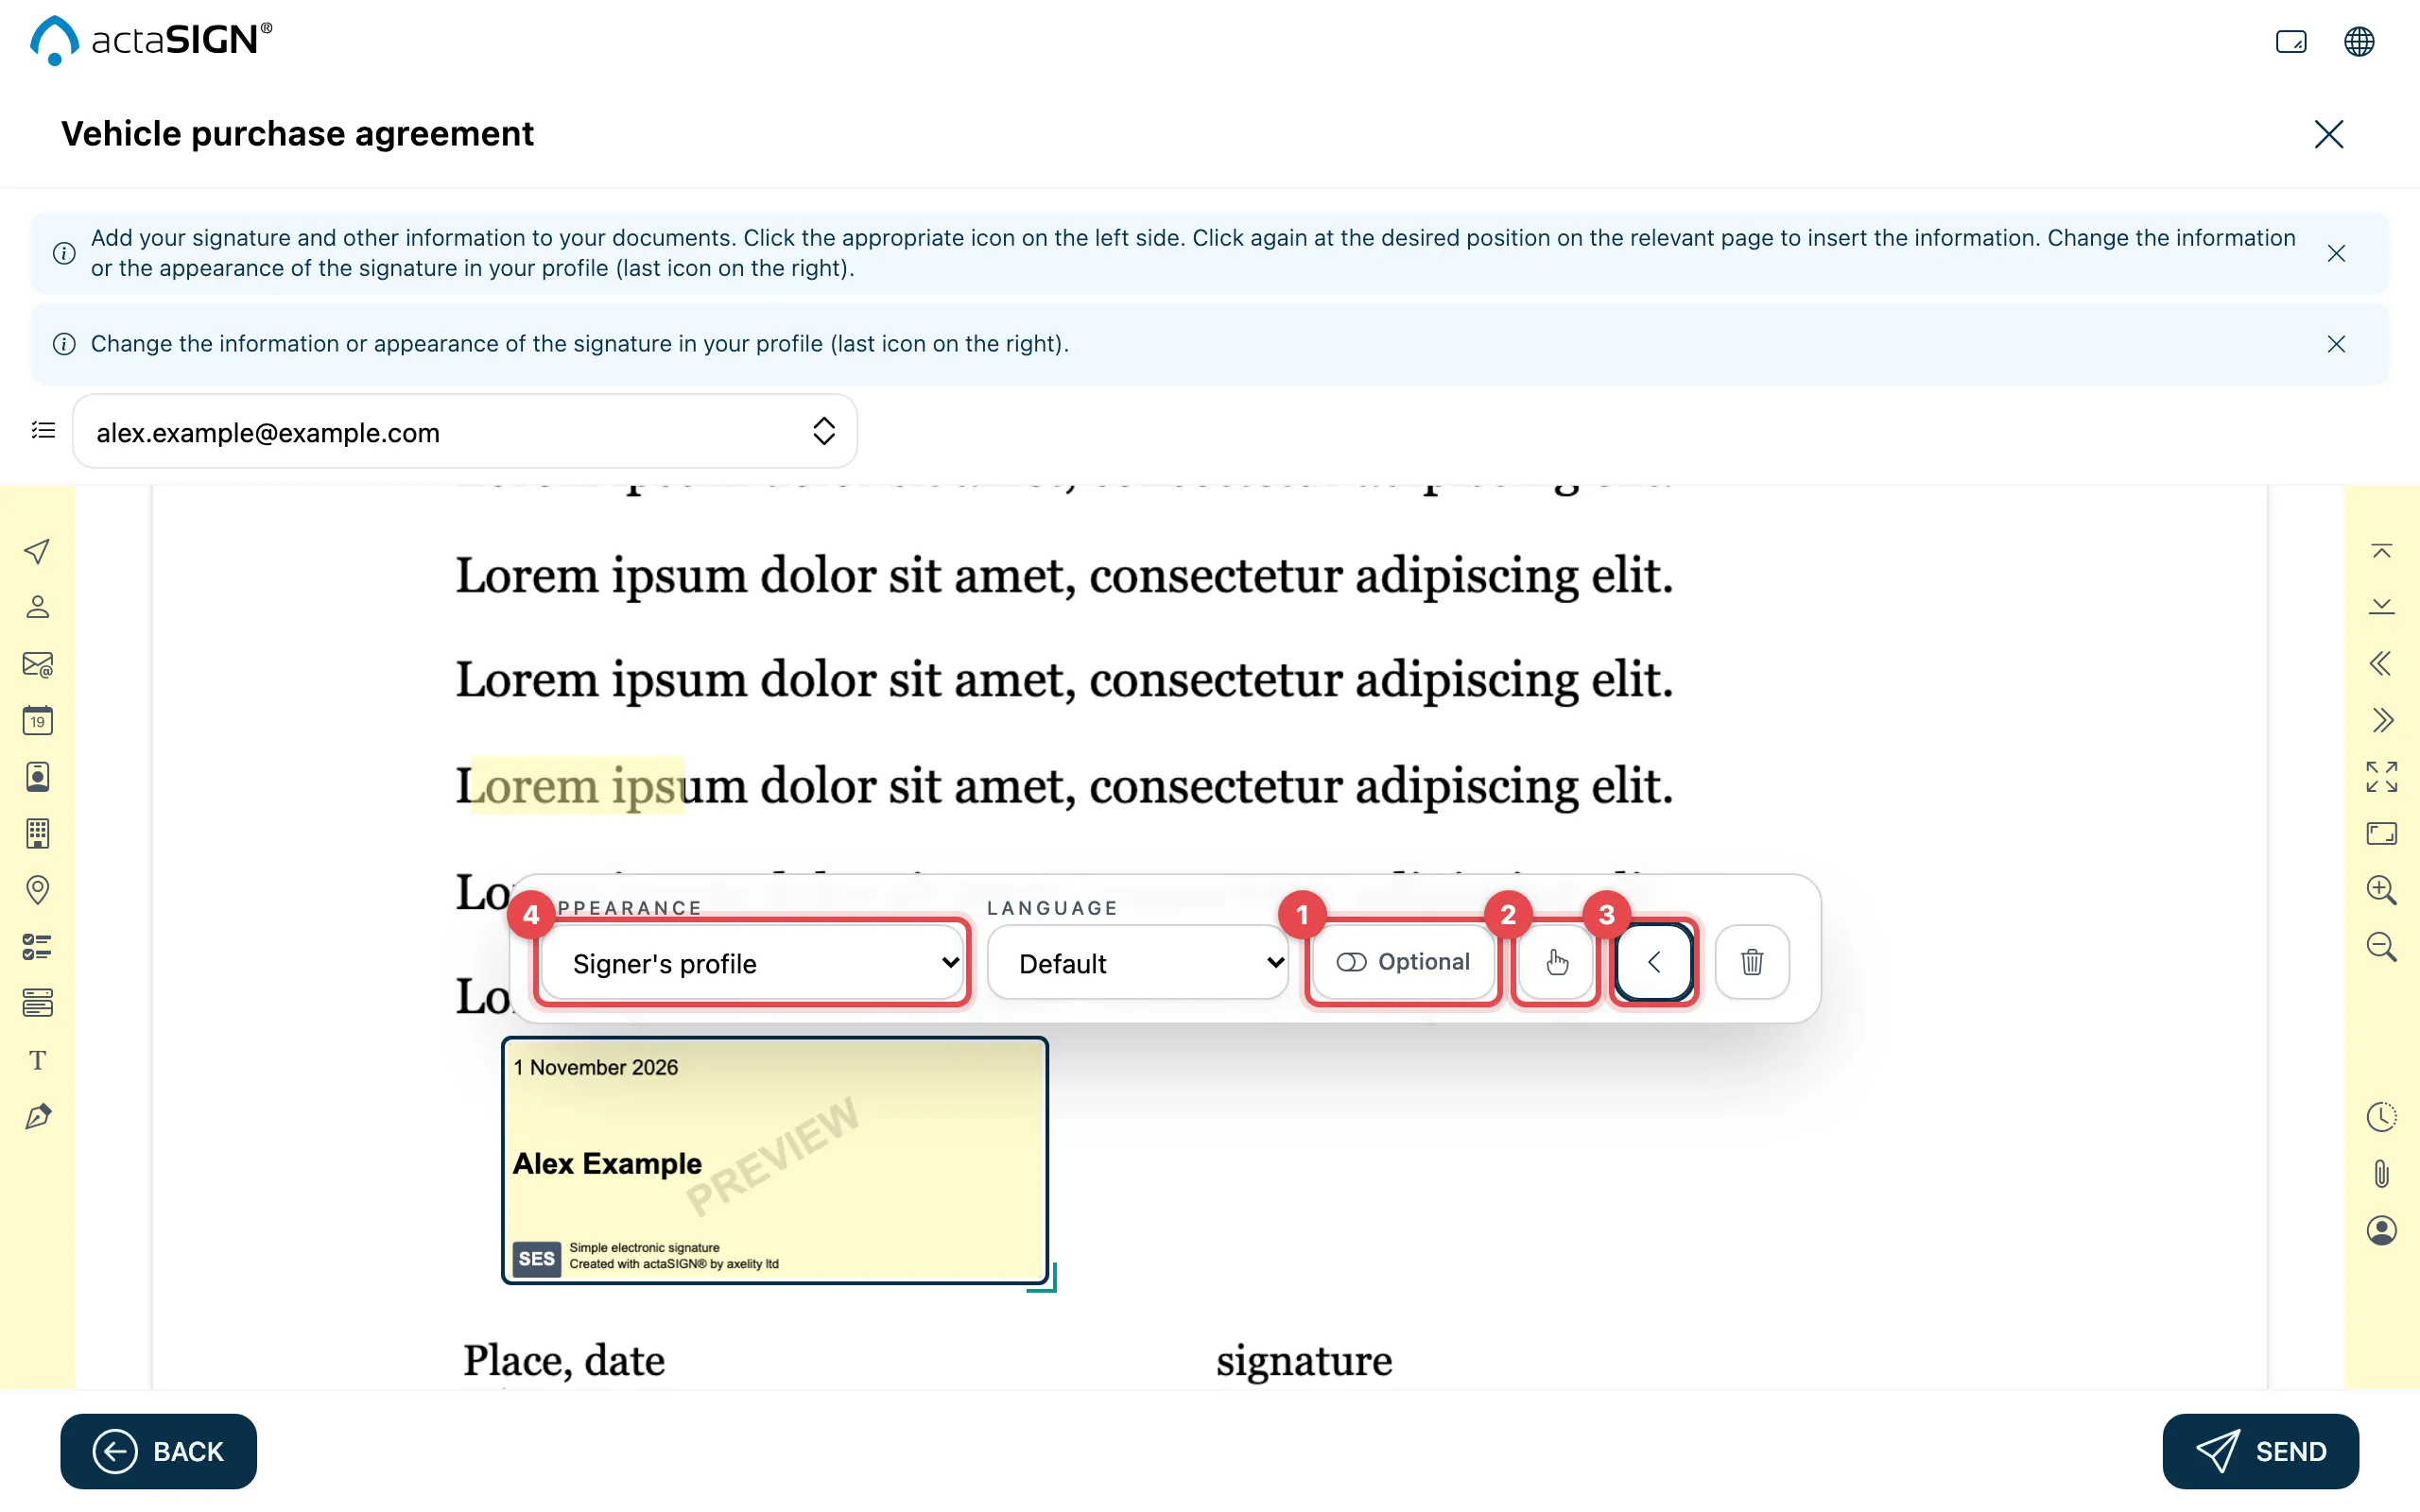
- Optional: the person decides for themselves whether to sign here. For each person, at least one signature must stay required.
- Hand icon (Confirm by click): the person must click the field before signing. The icon only appears if you chose Specific signature fields… under Click-to-confirm signatures in the task, see Permissions and options.
- Configure opens the further settings.
- Appearance: how the signature looks. Signer’s profile uses the setting from their profile.
If the person is a member of your organization, you also choose under Role which of their roles they sign with. Under Language you set the language of the signature text.
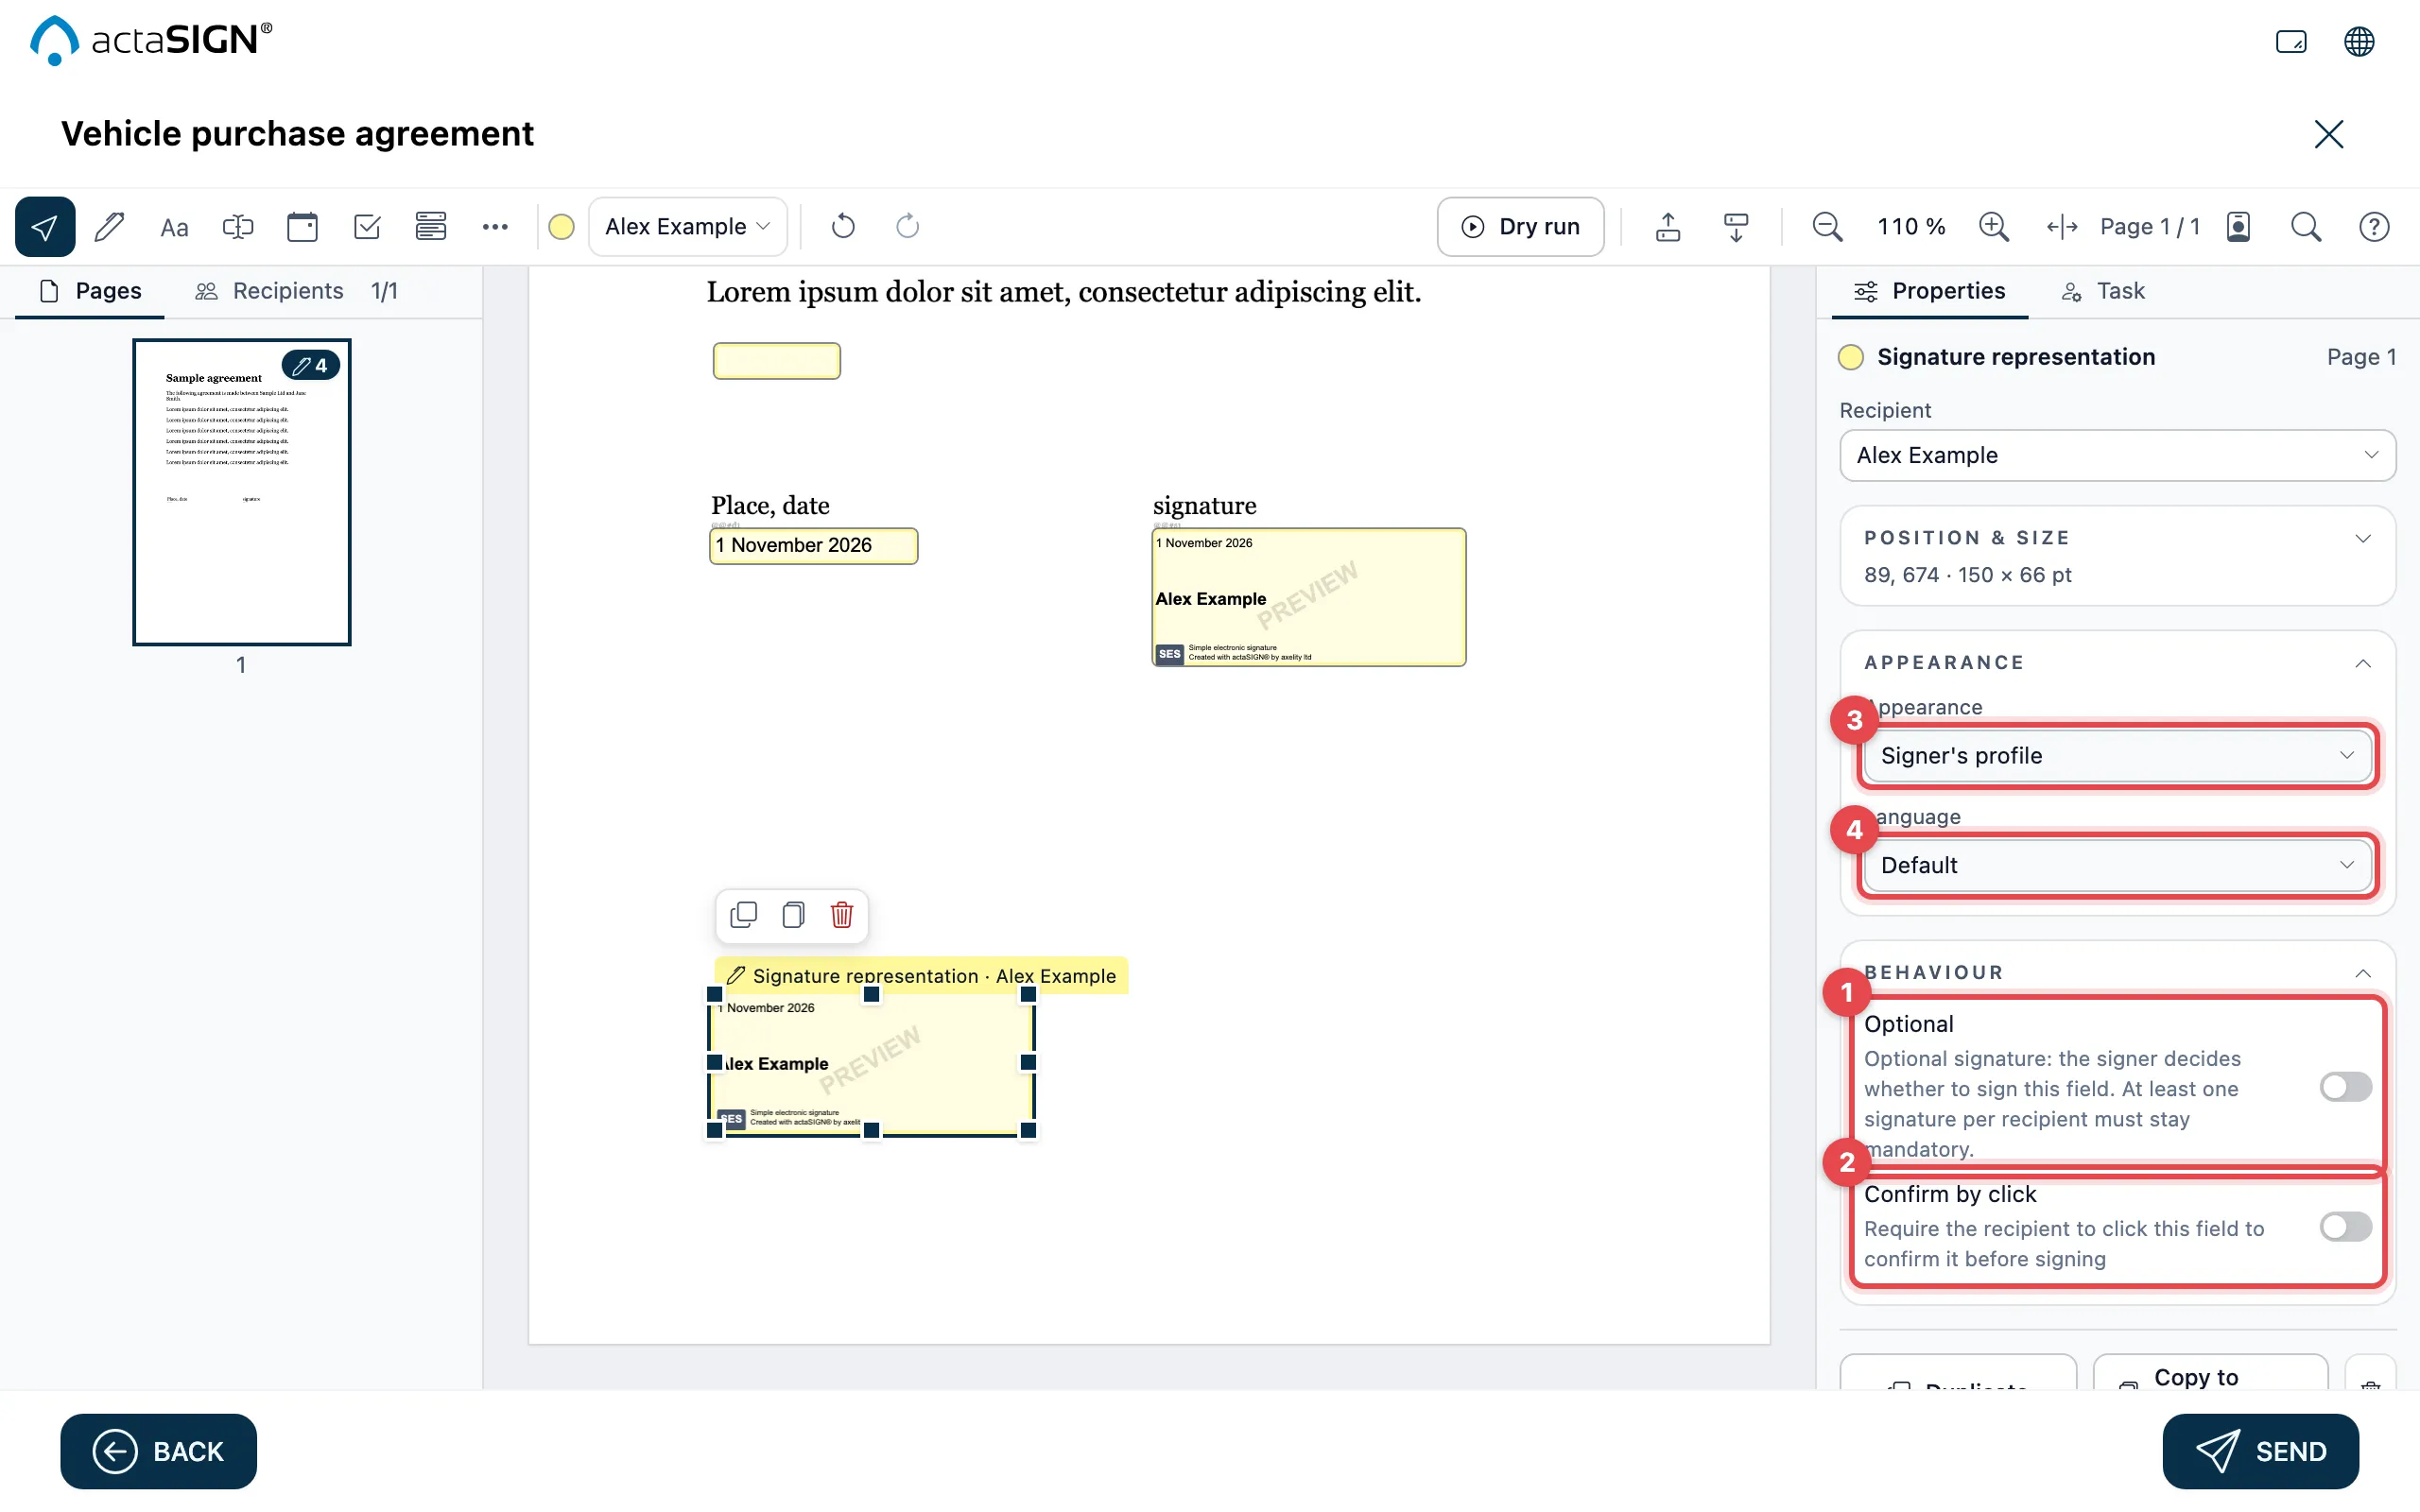
- Optional (Behaviour section): the person decides for themselves whether to sign here. For each person, at least one signature must stay required.
- Confirm by click: the person must click the field before signing.
- Appearance: how the signature looks. Signer’s profile uses the setting from their profile.
- Language: the language of the signature text.
Checkbox
Section titled “Checkbox”Under Configure you set:
- Default: the box is already ticked.
- Mark: Check (✓) or Cross (✗).
- Group: several checkboxes form a group. With + New group you create one; with Min and Max you set how many must or may be ticked.
In the checkbox’s Properties you set:
- Mark: Check (✓) or Cross (✗).
- Checked by default: the box is already ticked.
- Group: several checkboxes form a group. With + New group you create one; with Min and Max you set how many must or may be ticked.
Selection field
Section titled “Selection field”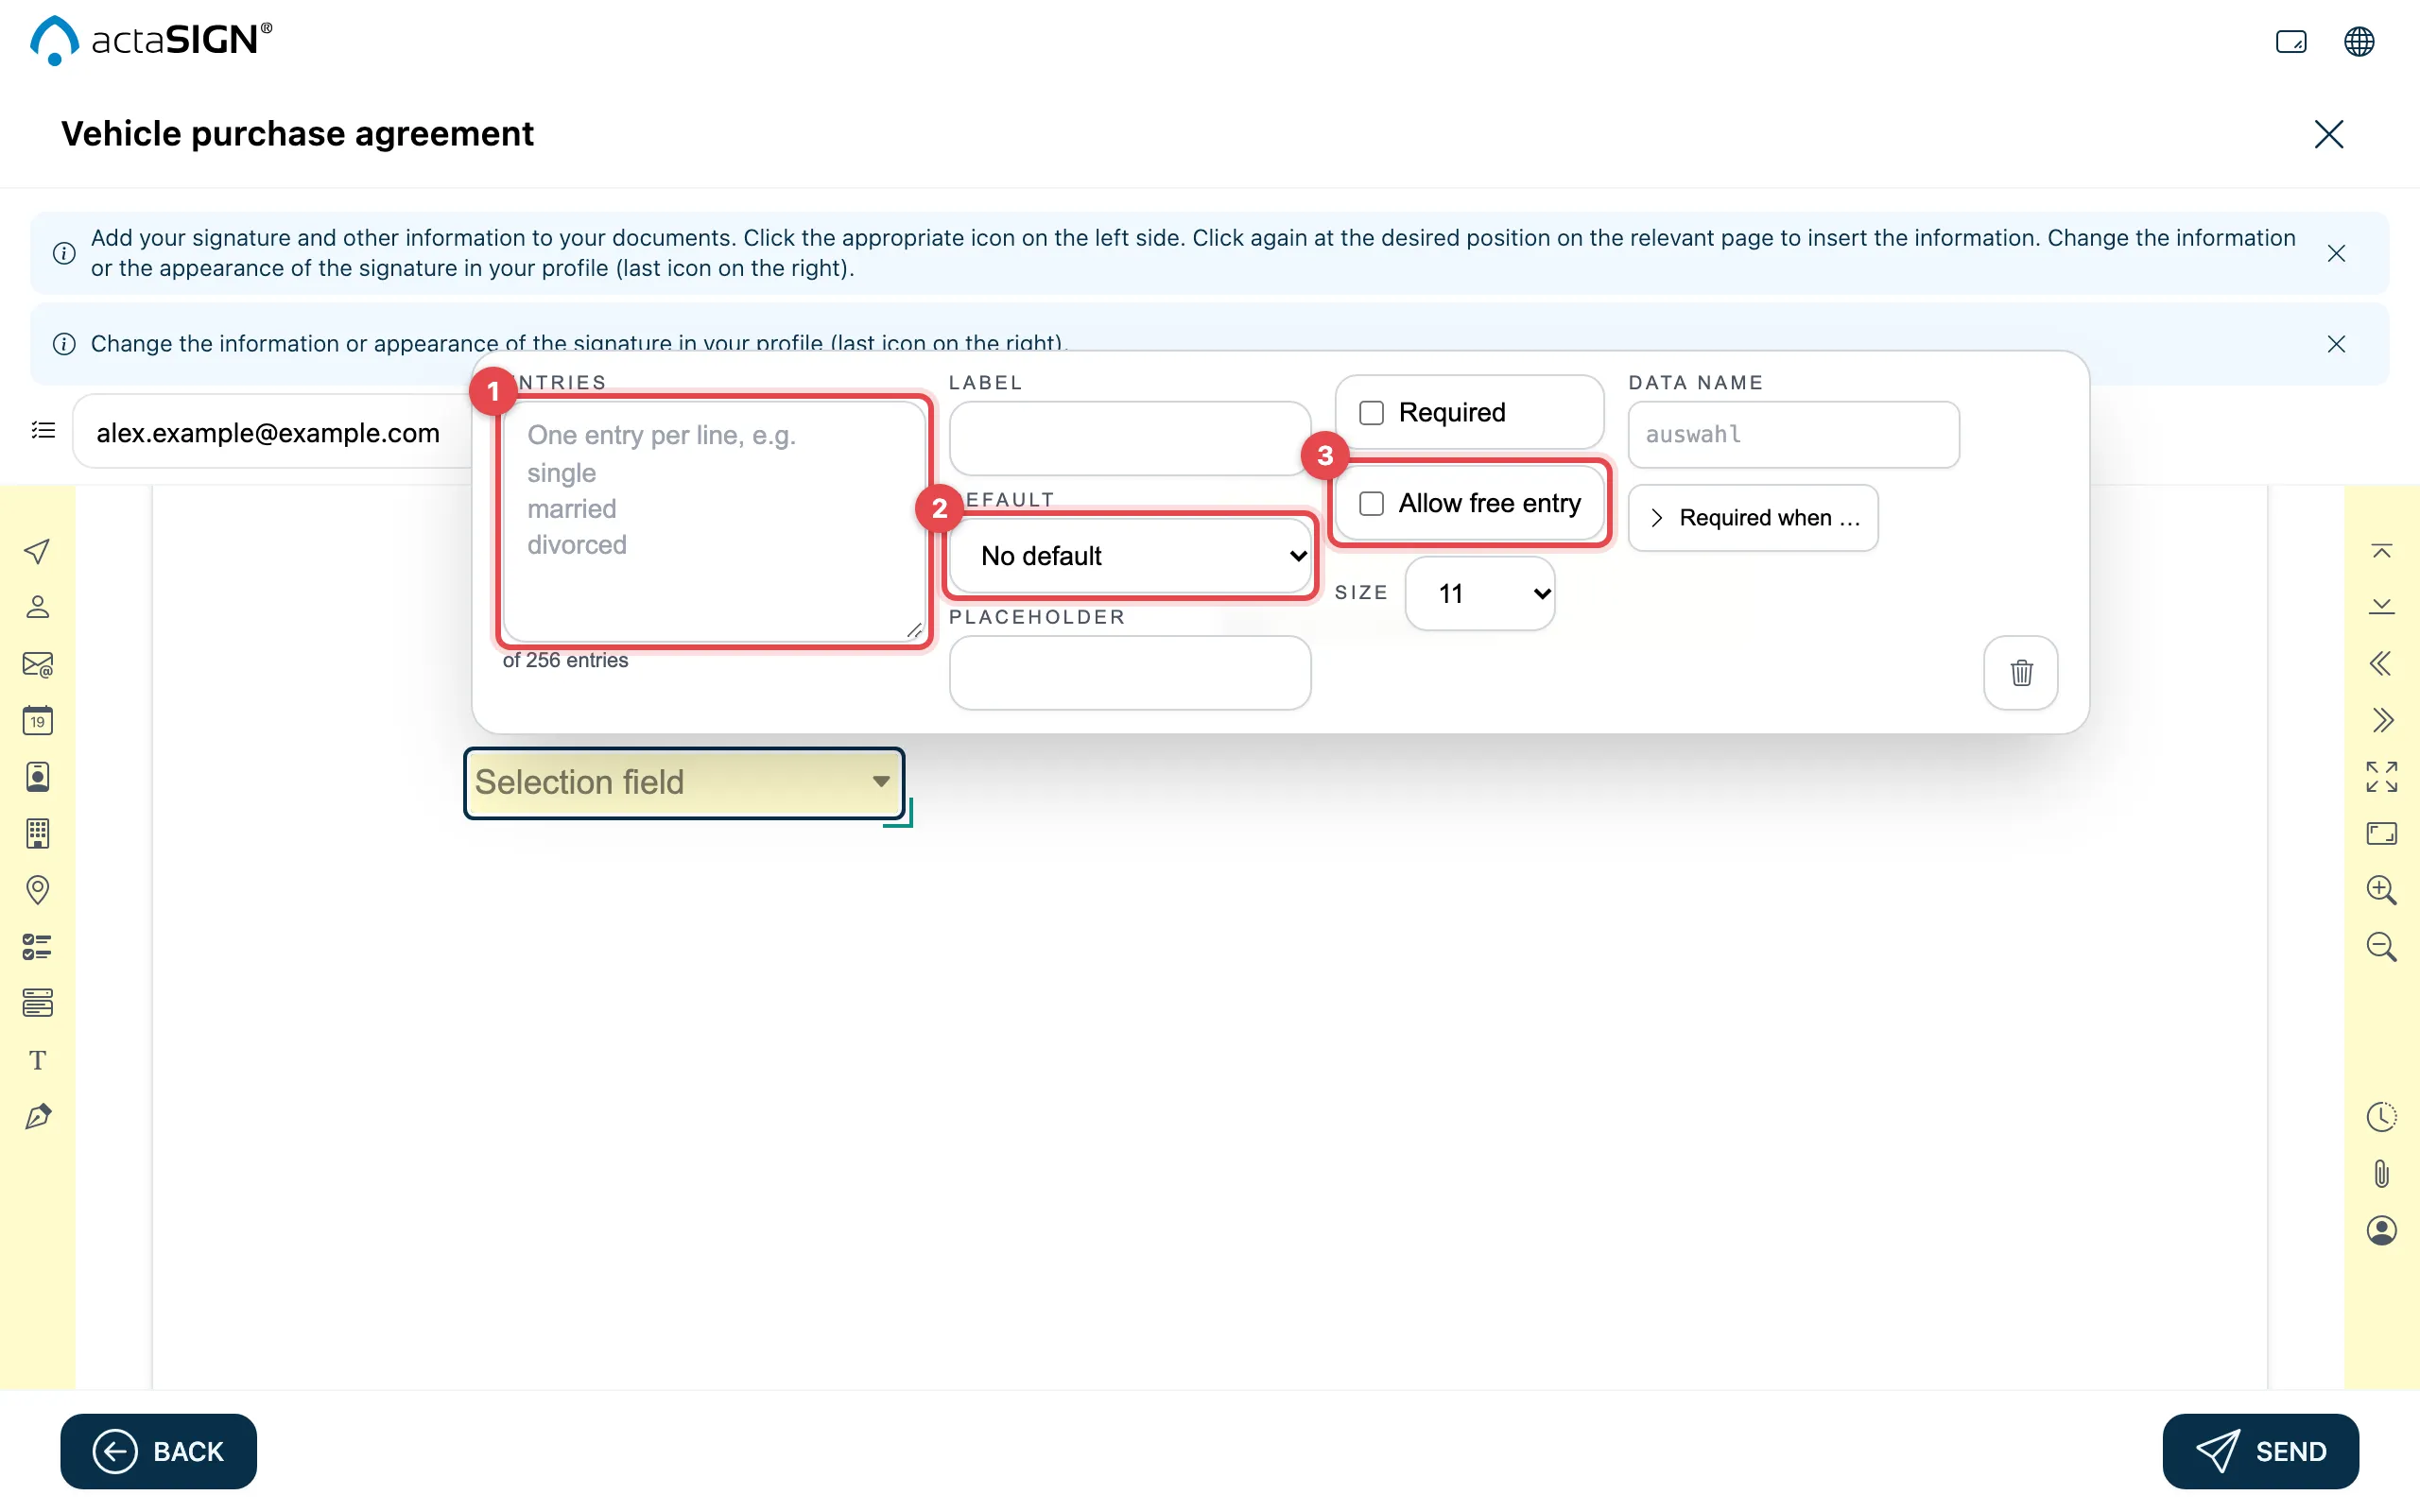
- Entries: one entry per line, e.g. single, married, divorced.
- Default: the entry that is already chosen, or No default.
- Allow free entry: the person can also type something else.
With Required, the person must choose an entry.
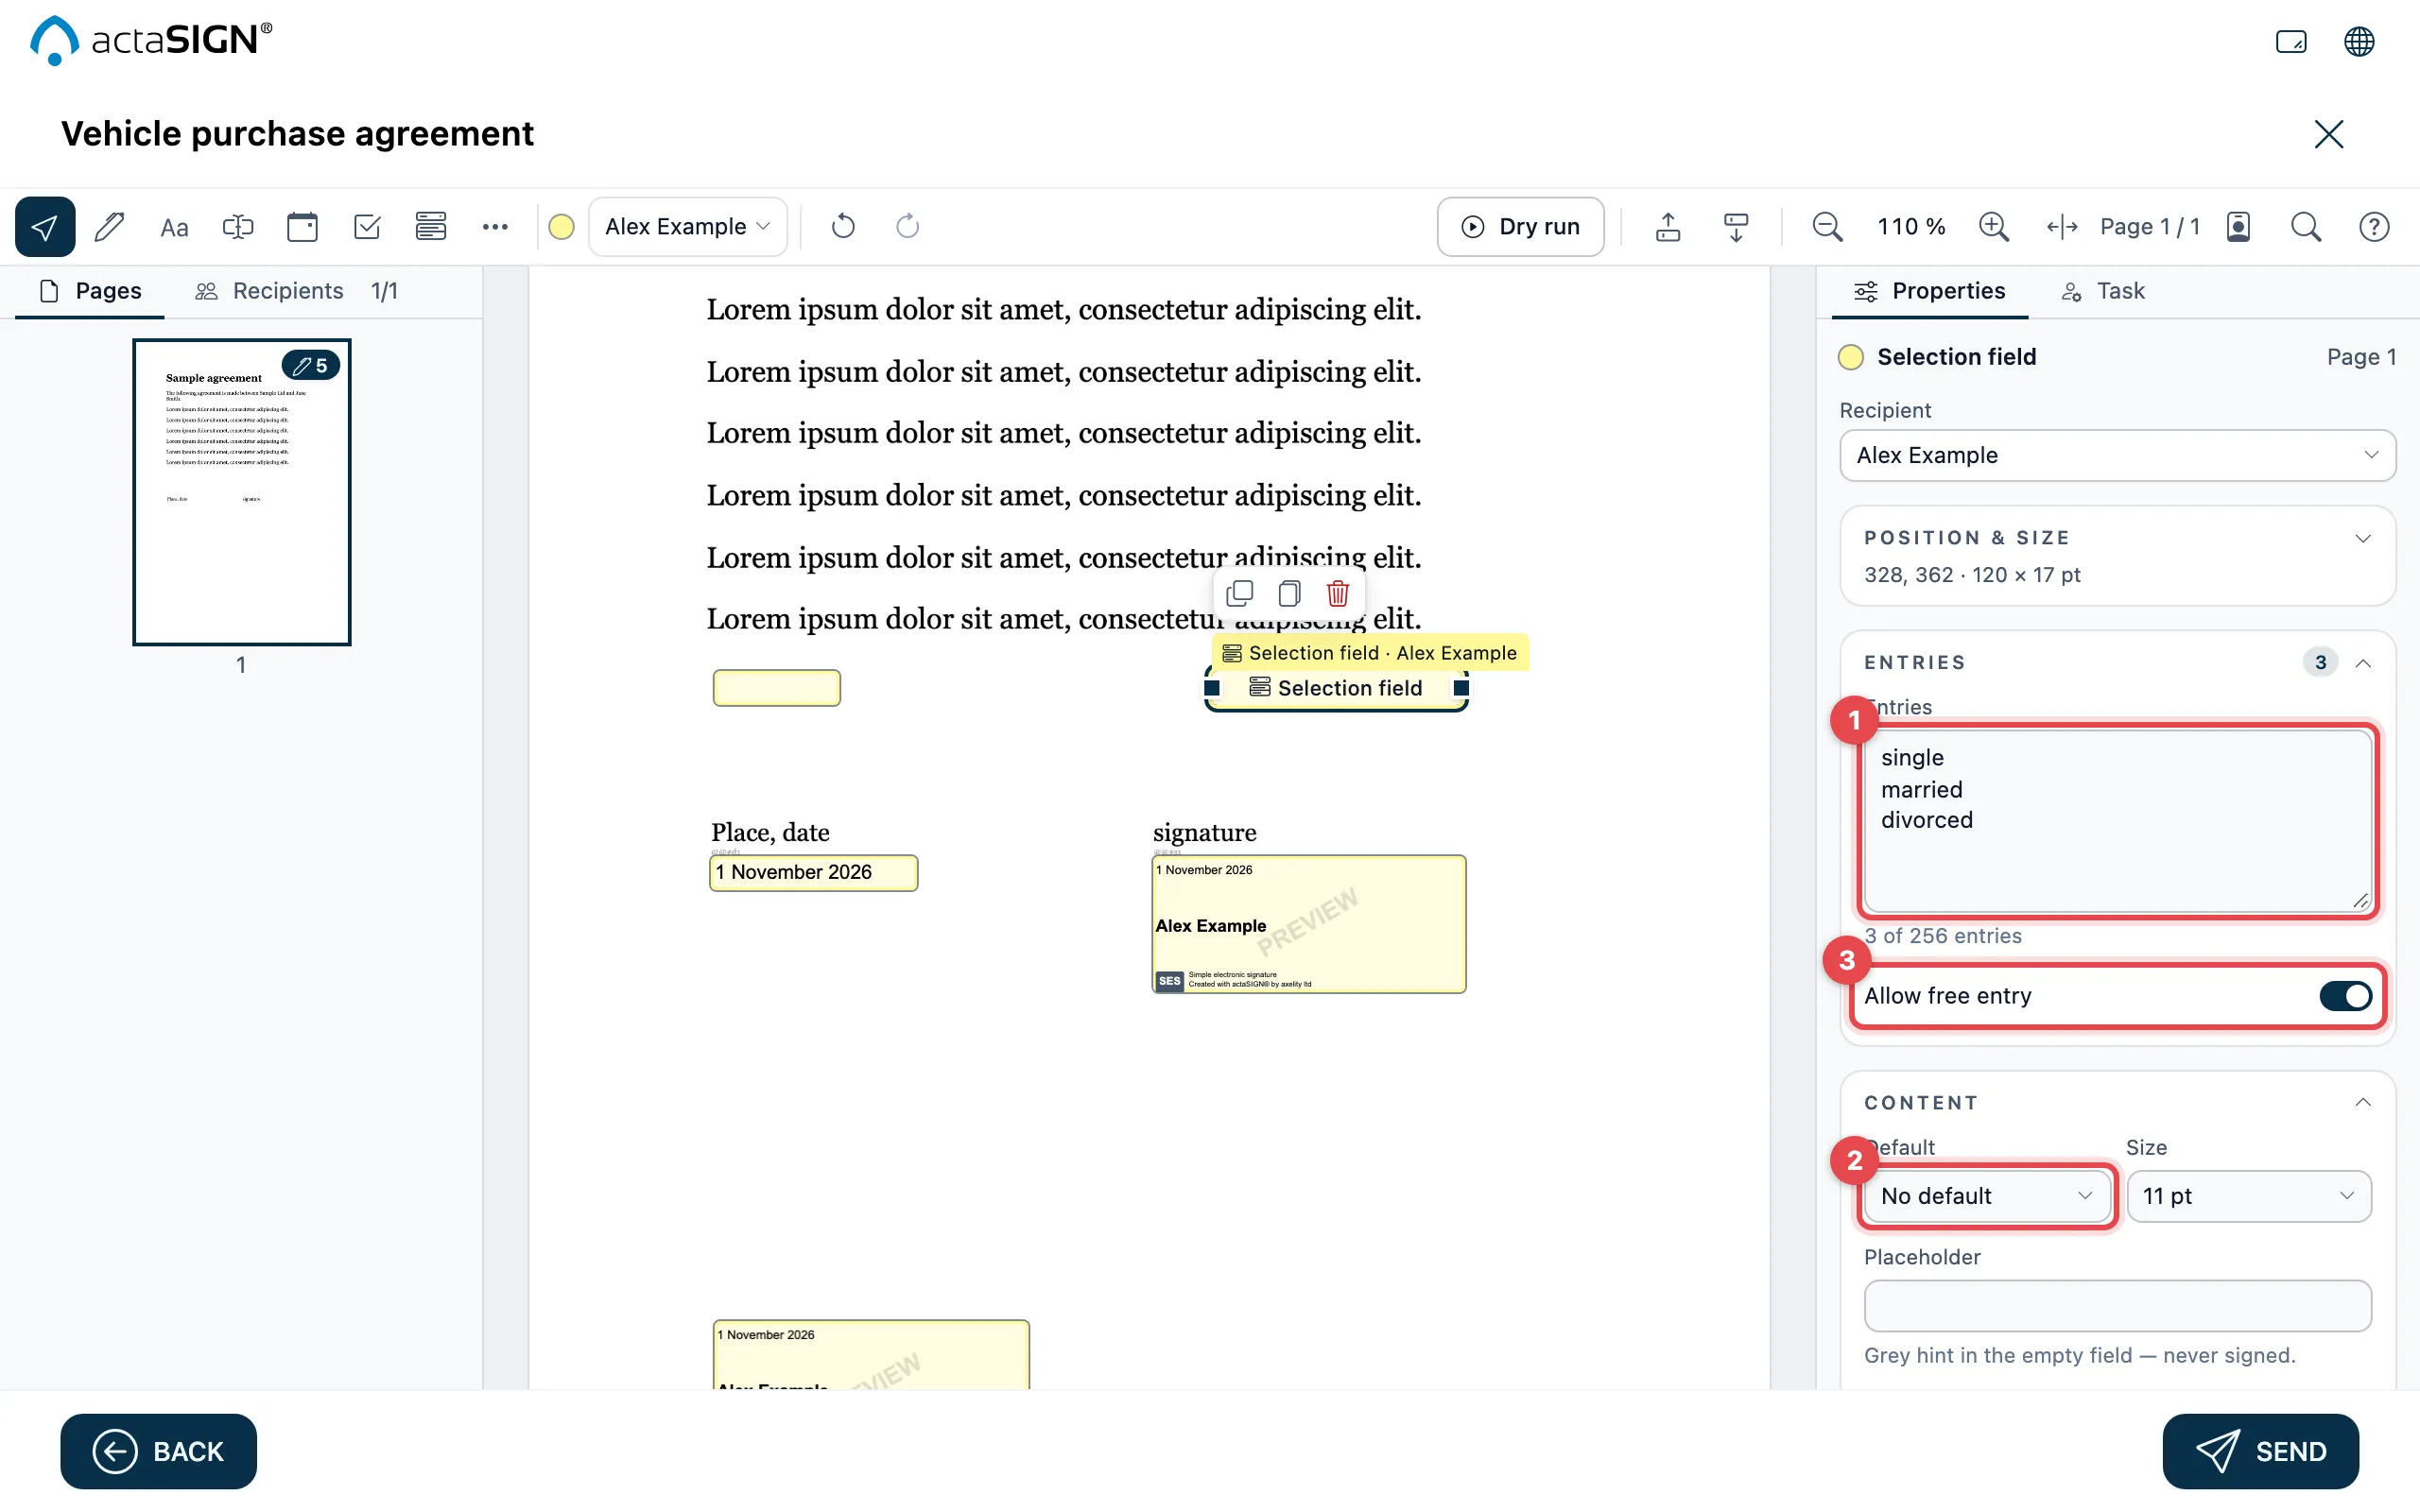
- Entries: one entry per line, e.g. single, married, divorced.
- Default (Content section): the entry that is already chosen, or No default.
- Allow free entry: the person can also type something else.
With Required (Input & validation section), the person must choose an entry.
Data name and conditional requirement
Section titled “Data name and conditional requirement”For text fields, selection fields and checkboxes, enter a name under Data name, e.g. “civil_status”. The entry appears under this name in the export of the form data.
For text and selection fields, use Required when … to make a field required only under a condition. Click + Condition, choose another field of the same person and the condition, e.g. is ticked.
You find the data name in the Properties, in the Data name section.
For text and selection fields, use the Dependencies section to make a field required only under a condition. Click Add condition, choose another field of the same person and the condition, e.g. is ticked. With several conditions, choose Any one or All required. Check that everything works as intended with the Dry run.
Good to know
Section titled “Good to know”- Each person with a signing task needs at least one signature field that is not optional. Otherwise Send stays grey and actaSIGN tells you why.
- For people with Approval (no signature) or Information only, you do not place signature fields.
- You can also have fields placed via placeholders in the PDF.
- If you chose View requirement with specific pages, click the eye at the top right of each required page.